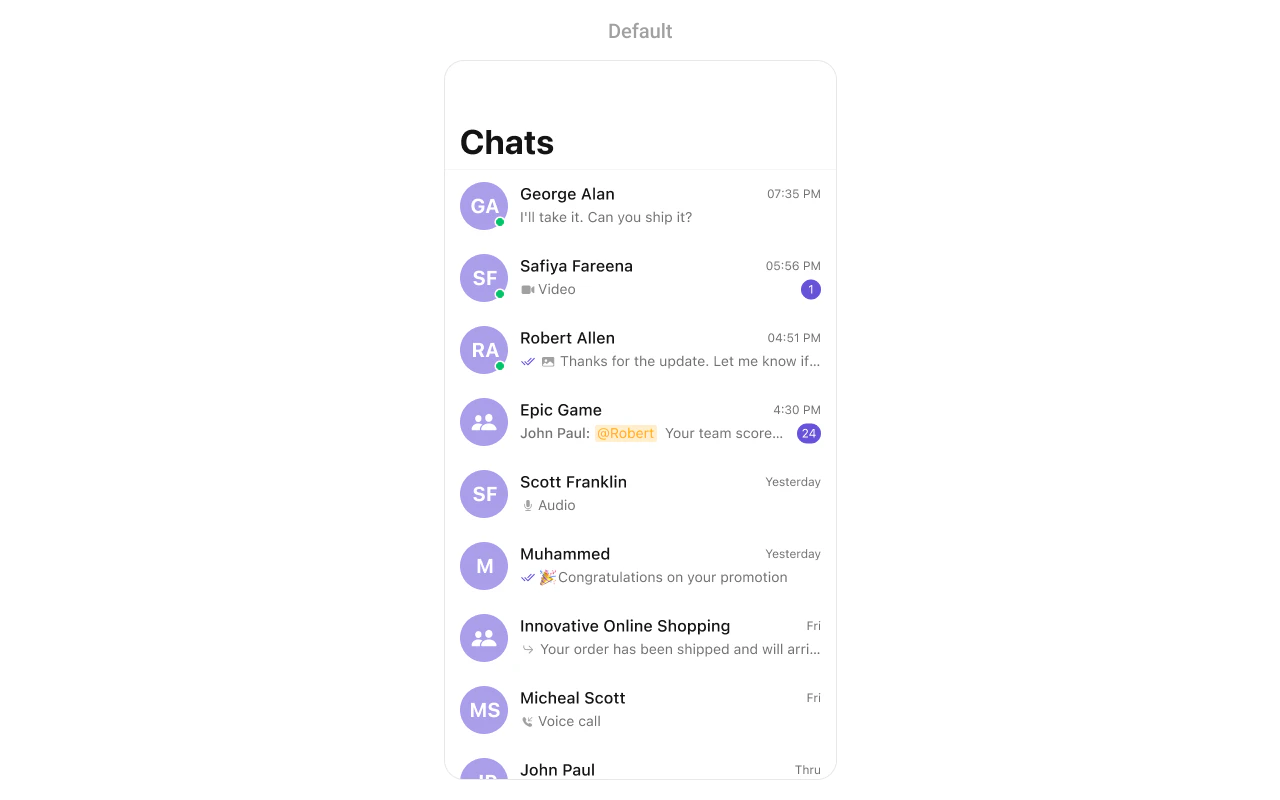
CometChatConversations component displays a list of all conversations (one-on-one and group chats) for the currently logged-in user. It shows the last message, unread count, typing indicators, and user presence in real-time.
AI Integration Quick Reference
AI Integration Quick Reference
| Field | Value |
|---|---|
| Component | CometChatConversations |
| Package | CometChatUIKitSwift |
| Inherits | UIViewController |
Where It Fits
CometChatConversations serves as the main entry point for chat functionality. It displays all conversations and navigates to CometChatMessages when a conversation is selected.
Minimal Render
Filtering
UseConversationRequest.ConversationRequestBuilder to filter which conversations appear in the list. The builder pattern allows chaining multiple filter conditions.
Filter Recipes
| Recipe | Code |
|---|---|
| Show only one-on-one chats | .set(conversationType: .user) |
| Show only group chats | .set(conversationType: .group) |
| Filter by tags | .withTags(true).set(tags: ["support", "sales"]) |
| Limit results | ConversationRequestBuilder(limit: 20) |
| Include user/group tags | .withUserAndGroupTags(true) |
Actions and Events
Callback Props
onItemClick
Fires when a user taps on a conversation. Use this to navigate to the messages screen.onItemLongClick
Fires when a user long-presses on a conversation. Use this to show additional options like delete or mute.onBack
Fires when the back button is pressed. Use this for custom navigation handling.onSelection
Fires when conversations are selected in selection mode. Returns the list of selected conversations.onError
Fires when an error occurs while loading conversations.onEmpty
Fires when the conversation list is empty.onLoad
Fires when conversations are successfully loaded.Actions Reference
| Method | Description | Example |
|---|---|---|
set(onItemClick:) | Triggered when a conversation is tapped | Navigate to messages |
set(onItemLongClick:) | Triggered on long press | Show options menu |
set(onBack:) | Triggered when back button is pressed | Custom navigation |
set(onSelection:) | Triggered in selection mode | Multi-select conversations |
set(onError:) | Triggered when an error occurs | Show error alert |
set(onEmpty:) | Triggered when list is empty | Show empty state |
set(onLoad:) | Triggered when conversations load | Analytics tracking |
Global UI Events
| Event | Fires when | Payload |
|---|---|---|
ccConversationDelete | A conversation is deleted | Conversation |
SDK Events (Real-Time, Automatic)
| SDK Listener | Internal behavior |
|---|---|
onMessageReceived | Updates last message and moves conversation to top |
onMessageEdited | Updates last message preview if edited message is latest |
onMessageDeleted | Updates last message preview if deleted message was latest |
onTypingStarted | Shows typing indicator for the conversation |
onTypingEnded | Hides typing indicator for the conversation |
onUserOnline | Updates online status indicator for user conversations |
onUserOffline | Updates offline status indicator for user conversations |
onGroupMemberJoined | Updates group member count |
onGroupMemberLeft | Updates group member count |
Custom View Slots
| Slot | Signature | Replaces |
|---|---|---|
listItemView | (Conversation) -> UIView | Entire conversation row |
leadingView | (Conversation) -> UIView | Avatar / left section |
titleView | (Conversation) -> UIView | Name / title text |
subtitleView | (Conversation) -> UIView | Last message preview |
tailView | (Conversation) -> UIView | Right side (time, badge) |
emptyStateView | () -> UIView | Empty state display |
errorStateView | () -> UIView | Error state display |
loadingStateView | () -> UIView | Loading state display |
listItemView
Replace the entire conversation row with a custom design.subtitleView
Customize just the subtitle area below the conversation name.leadingView
Customize the avatar / left section of the conversation row.| Signature | (Conversation) -> UIView |
| Replaces | Avatar / left section |
titleView
Customize the title area that displays the conversation name.| Signature | (Conversation) -> UIView |
| Replaces | Name / title text area |
tailView
Customize the right side of the conversation row (time, unread badge). Note: The setter method isset(trailView:).
Styling
Style Hierarchy
- Global styles (
CometChatConversation.style) apply to all instances - Instance styles override global for specific instances
Global Level Styling
Instance Level Styling
Key Style Properties
| Property | Type | Default | Description |
|---|---|---|---|
backgroundColor | UIColor | CometChatTheme.backgroundColor01 | Background color of the list |
titleFont | UIFont? | CometChatTypography.setFont(size: 17, weight: .bold) | Font for the navigation title |
titleColor | UIColor? | CometChatTheme.textColorPrimary | Color for the navigation title |
listItemTitleTextColor | UIColor | CometChatTheme.textColorPrimary | Color for conversation names |
listItemTitleFont | UIFont | CometChatTypography.Heading4.medium | Font for conversation names |
listItemSubTitleTextColor | UIColor | CometChatTheme.textColorSecondary | Color for last message preview |
listItemSubTitleFont | UIFont | CometChatTypography.Body.regular | Font for last message preview |
listItemBackground | UIColor | .clear | Background color for list items |
listItemCornerRadius | CometChatCornerStyle | CometChatCornerStyle(cornerRadius: 0) | Corner radius for list items |
borderWidth | CGFloat | 0 | Border width for the component |
borderColor | UIColor | .clear | Border color for the component |
Customization Matrix
| What to change | Where | Property/API | Example |
|---|---|---|---|
| Background color | Style | backgroundColor | UIColor.systemBackground |
| Title appearance | Style | titleFont, titleColor | UIFont.boldSystemFont(ofSize: 18) |
| List item look | Style | listItemBackground | UIColor(white: 0.95, alpha: 1.0) |
| Unread badge | Style | badgeStyle | BadgeStyle() with custom colors |
| Avatar appearance | Style | avatarStyle | AvatarStyle() with custom radius |
| Hide search | Property | hideSearch | conversations.hideSearch = true |
| Hide receipts | Property | hideReceipts | conversations.hideReceipts = true |
| Custom row | View Slot | set(listItemView:) | See Custom View Slots section |
Methods
Swipe Action Methods
set(options:)
Sets custom swipe actions for conversation list items, replacing the default options.| Parameter | Type | Description |
|---|---|---|
options | ((Conversation?) -> [CometChatConversationOption])? | Closure that returns an array of swipe action options for a conversation |
add(options:)
Adds additional swipe actions to the existing default options.| Parameter | Type | Description |
|---|---|---|
options | ((Conversation?) -> [CometChatConversationOption])? | Closure that returns additional swipe action options to append |
Data Manipulation Methods
insert(conversation:at:)
Inserts a conversation at a specific index in the list.| Parameter | Type | Description |
|---|---|---|
conversation | Conversation | The conversation to insert |
index | Int | The position at which to insert the conversation |
getSelectedConversations()
Returns the list of currently selected conversations when in selection mode.getConversationList()
Returns the complete list of conversations currently displayed.Connection Methods
connect()
Manually establishes the WebSocket connection for real-time updates. Use this when you need to reconnect after callingdisconnect().
disconnect()
Manually disconnects the WebSocket connection. Use this when you want to temporarily stop receiving real-time updates, such as when the view is not visible.Text Formatter Methods
set(textFormatters:)
Sets custom text formatters for processing and displaying message text in conversation subtitles.| Parameter | Type | Description |
|---|---|---|
textFormatters | [CometChatTextFormatter] | Array of text formatters to apply to message text |
Props
All props are optional. Sorted alphabetically.avatarStyle
Customizes the appearance of avatars in conversation list items.| Type | AvatarStyle |
| Default | AvatarStyle() |
badgeStyle
Customizes the appearance of unread message count badges.| Type | BadgeStyle |
| Default | BadgeStyle() |
conversationRequestBuilder
Custom request builder for filtering which conversations appear.| Type | ConversationRequest.ConversationRequestBuilder? |
| Default | nil |
dateStyle
Customizes the appearance of date/time labels in conversation list items.| Type | DateStyle |
| Default | DateStyle() |
dateTimeFormatter
Custom formatter for date/time display in conversation list items.| Type | CometChatDateTimeFormatter? |
| Default | nil |
customSoundForMessages
Custom sound URL for new message notifications.| Type | URL? |
| Default | nil |
disableSoundForMessages
Disables notification sounds for new messages.| Type | Bool |
| Default | false |
disableTyping
Disables typing indicators in the conversation list.| Type | Bool |
| Default | false |
hideBackButton
Hides the back button in the navigation bar.| Type | Bool |
| Default | false |
hideDeleteConversationOption
Hides the delete option in conversation actions.| Type | Bool |
| Default | false |
hideGroupType
Hides the public/private group type icons.| Type | Bool |
| Default | false |
hideNavigationBar
Hides the entire navigation bar.| Type | Bool |
| Default | false |
hideReceipts
Hides read/delivered receipt indicators.| Type | Bool |
| Default | false |
hideSearch
Hides the search bar.| Type | Bool |
| Default | false |
hideUserStatus
Hides online/offline status indicators.| Type | Bool |
| Default | false |
onSearchClick
Callback triggered when the search button is clicked.| Type | (() -> Void)? |
| Default | nil |
privateGroupIcon
Custom icon for private group conversations.| Type | UIImage? |
| Default | nil |
protectedGroupIcon
Custom icon for password-protected group conversations.| Type | UIImage? |
| Default | nil |
receiptStyle
Customizes the appearance of message receipt indicators (sent, delivered, read).| Type | ReceiptStyle |
| Default | ReceiptStyle() |
selectionMode
Sets the selection mode for multi-select functionality.| Type | SelectionMode |
| Default | .none |
statusIndicatorStyle
Customizes the appearance of online/offline status indicators.| Type | StatusIndicatorStyle |
| Default | StatusIndicatorStyle() |
textFormatters
Array of text formatters for customizing message text display.| Type | [CometChatTextFormatter] |
| Default | [] |
typingIndicatorStyle
Customizes the appearance of typing indicators in conversation list items.| Type | TypingIndicatorStyle |
| Default | TypingIndicatorStyle() |
Events
| Event | Payload | Fires when |
|---|---|---|
ccConversationDelete | Conversation | A conversation is deleted from the list |
Date Time Formatter
Customize how timestamps appear in the conversation list using thedatePattern callback.
Global Level Formatting
Instance Level Formatting
Available Formatters
| Formatter | Purpose | Default Format |
|---|---|---|
datePattern | Format for all timestamps | h:mm a for today, MMM d for older |
Common Customizations
Mention Configuration
Configure how @all mentions appear in conversation list items. When a message contains an @all mention, the conversation subtitle displays the mention with a customizable label.setMentionAllLabel
Sets a custom label for @all mentions displayed in conversation list items.| Parameter | Type | Description |
|---|---|---|
id | String | The identifier for the @all mention (typically “all”) |
label | String | The display text shown to users when @all is mentioned |
Common Patterns
Tab bar integration
Full implementation with tab bar showing CometChatConversations in a real app:Custom empty state with CTA
Hide all chrome — minimal list
Filter by conversation type
Related Components
- Messages - Display messages in a conversation
- Users - List all users to start new conversations
- Groups - List all groups
- Message Composer - Send messages in a conversation
- Conversation With Messages - Combined conversations and messages view