Getting Started with CometChat iOS UI Kit
The CometChat UI Kit for iOS streamlines the integration of in-app chat functionality by providing a comprehensive set of prebuilt UI elements. It offers seamless theming options, including light and dark modes, customizable fonts, colors, and extensive styling capabilities.
With built-in support for one-to-one and group conversations, developers can efficiently enable chat features within their applications. Follow this guide to quickly integrate chat functionality using the CometChat iOS UI Kit.
Prerequisites
Before installing the CometChat UI Kit for iOS, you must first create a CometChat application via the CometChat Dashboard. The dashboard provides all the essential chat service components, including:
- User Management
- Group Chat & Messaging
- Voice & Video Calling
- Real-time Notifications
To initialize the UI Kit, you will need the following credentials from your CometChat application:
- App ID
- Auth Key
- Region
Ensure you have these details ready before proceeding with the installation and configuration.
Register & Set Up CometChat
Follow these steps to register on CometChat and set up your development environment.
Step 1: Register on CometChat
To use CometChat UI Kit, you first need to register on the CometChat Dashboard.
Step 2: Get Your Application Keys
After registering, create a new app and retrieve your authentication details:
- Navigate to the QuickStart or API & Auth Keys section.
- Note down the following keys:
- App ID
- Auth Key
- Region
Each CometChat application can be integrated with a single client app. Users within the same application can communicate across multiple platforms, including web and mobile.
Step 3: Set Up Your Development Environment
Ensure your system meets the following prerequisites before proceeding with integration.
System Requirements:
- Xcode 16 or later installed on your machine.
- An iOS device or simulator with iOS version 13.0 or above.
- Swift 5.0.
- macOS.
Integration Steps
Create an iOS Project
To get started, open Xcode and create a new project for UI Kit in the Project window as follows:
- Select iOS App in the Choose a template for your new project window and click Next.
- Enter your project name in the Name field in the Choose options for your new project window.
- Enter your identifier in the Bundle Identifier field in the Choose options for your new project window.
- Select Storyboard in the Interface field in the Choose options for your new project window.
- Select Swift in the Language field in the Choose options for your new project window.
Install Dependencies
This developer kit is an add-on feature to CometChat iOS SDK so installing it will also install the core Chat SDK. You can install CometChat UI Kit into your iOS project using CocoaPods or Swift Package Manager (SPM).
- CocoaPods
- Swift Package Manager (SPM)
We recommend using CocoaPods, as they are the most advanced way of managing iOS project dependencies.
- Create pod file by running the following command in your project's base level:
$ pod init
- Add CometChat SDKs to Your Podfile:
platform :ios, '13.0'
use_frameworks!

target 'YourApp' do
  # CometChat UI Kit for Swift
  pod 'CometChatUIKitSwift', '5.0.1'

  # Optional: Include if you're using Audio/Video Calling
  pod 'CometChatCallsSDK', '4.1.0'
end
- Install the CometChat UI Kit framework through CocoaPods:
$ pod install
If you're facing any issues while installing pods, use the following command:
$ pod install --repo-update
To get the latest version of CometChat UI Kit, use:
$ pod update CometChatUIKitSwift
$ pod update CometChatCallsSDK
Always ensure to open the XCFramework file after adding the dependencies.
Swift Package Manager (SPM) is Apple's built-in tool for managing dependencies in Swift projects. It allows developers to integrate and manage third-party libraries seamlessly.
-
Go to File tab and select Add Package Dependencies.
-
Enter the repository URL of the Swift package:
https://github.com/cometchat/cometchat-uikit-ios
-
To add the package, select Version Rules, enter Up to Exact Version and click Add package.
Exact Version:
5.0.1 -
Add
CometChatSDKrepeating the above steps for following link and exact version:Link:
https://github.com/cometchat/chat-sdk-iosExact Version:
4.0.55
Configure Privacy Permissions
-
To enable media messaging in your app, you must allow Camera, Microphone, and Photo Library access in
Info.plist. These permissions are required for sending and receiving media files.Info.plist<key>NSCameraUsageDescription</key>
<string>Allow access to the camera to capture photos and videos.</string>
<key>NSMicrophoneUsageDescription</key>
<string>Enable microphone access for voice and video communication.</string>
<key>NSPhotoLibraryAddUsageDescription</key>
<string>Allow saving photos and videos to your device's photo library.</string>
<key>NSPhotoLibraryUsageDescription</key>
<string>Grant access to select and upload photos from your library.</string>
-
Navigate to your Build Settings and disable the User Script Sandboxing option.
Disabling User Script Sandboxing ensures that WebView can load and execute scripts necessary for collaborative tools.

Initialize & Login to CometChat UI Kit
To authenticate a user, you need a UID. You can either:
-
Create new users on the CometChat Dashboard, CometChat SDK Method or via the API.
-
Use pre-generated test users:
cometchat-uid-1cometchat-uid-2cometchat-uid-3cometchat-uid-4cometchat-uid-5
The Login method returns a User object containing all relevant details of the logged-in user.
Security Best Practices
- The Auth Key method is recommended for proof-of-concept (POC) development and early-stage testing.
- For production environments, it is strongly advised to use an Auth Token instead of an Auth Key to enhance security and prevent unauthorized access.
You can initialize CometChat and log in a user in your SceneDelegate.swift file:
⚠️ Important: Initialization and login are independent steps. However, the CometChat SDK must be initialized before you call the login method.
import UIKit
import CometChatUIKitSwift

class SceneDelegate: UIResponder, UIWindowSceneDelegate {

    var window: UIWindow?

    func scene(_ scene: UIScene, willConnectTo session: UISceneSession, options connectionOptions: UIScene.ConnectionOptions) {

        guard let windowScene = (scene as? UIWindowScene) else { return }

        let uikitSettings = UIKitSettings()
            .set(appID: "<#Enter Your App ID Here#>")
            .set(region: "<#Enter Your Region Code Here#>")
            .set(authKey: "<#Enter Your AuthKey Here#>")
            .subscribePresenceForAllUsers()
            .build()

        CometChatUIKit.init(uiKitSettings: uikitSettings) { result in
            switch result {
            case .success:
                debugPrint("CometChat UI Kit initialization succeeded")

                let uid = "cometchat-uid-1"

                CometChatUIKit.login(uid: uid) { loginResult in
                    switch loginResult {
                    case .success:
                        debugPrint("CometChat UI Kit login succeeded")

                    // ✅ Option 1: Launch One-to-One or Group Chat Screen
                    // DispatchQueue.main.async {
                    //  self.setUpOneOneOrGroupConversation(windowScene: windowScene, uid: "cometchat-uid-2")
                    // }

                    // ✅ Option 2: Launch Conversation List + Message View (Split-Screen Style)
                    // DispatchQueue.main.async {
                    //  self.setupConversationsView(windowScene: windowScene)
                    // }

                    // ✅ Option 3: Launch Tab-Based Chat Experience (Chats, Calls, Users, Groups)
                    // DispatchQueue.main.async {
                    //    self.setupTabbedView(windowScene: windowScene)
                    // }

                    case .onError(let error):
                        debugPrint("CometChat UI Kit login failed with error: \(error.description)")
                    @unknown default:
                        break
                    }
                }

            case .failure(let error):
                debugPrint("CometChat UI Kit initialization failed with error: \(error.localizedDescription)")
            }
        }
    }
}
Ensure you replace the following placeholders with your actual CometChat credentials:
- App ID → Your CometChat App ID
- Auth Key → Your CometChat Auth Key
- Region → Your App Region
These values are required for proper authentication and seamless integration.
After running the app, you should see the following log message:
"CometChat UI Kit initialization succeeded"
"CometChat UI Kit login succeeded"
Step 5: Choose a Chat Experience
Integrate a conversation view that suits your application's UX requirements. Below are the available options:
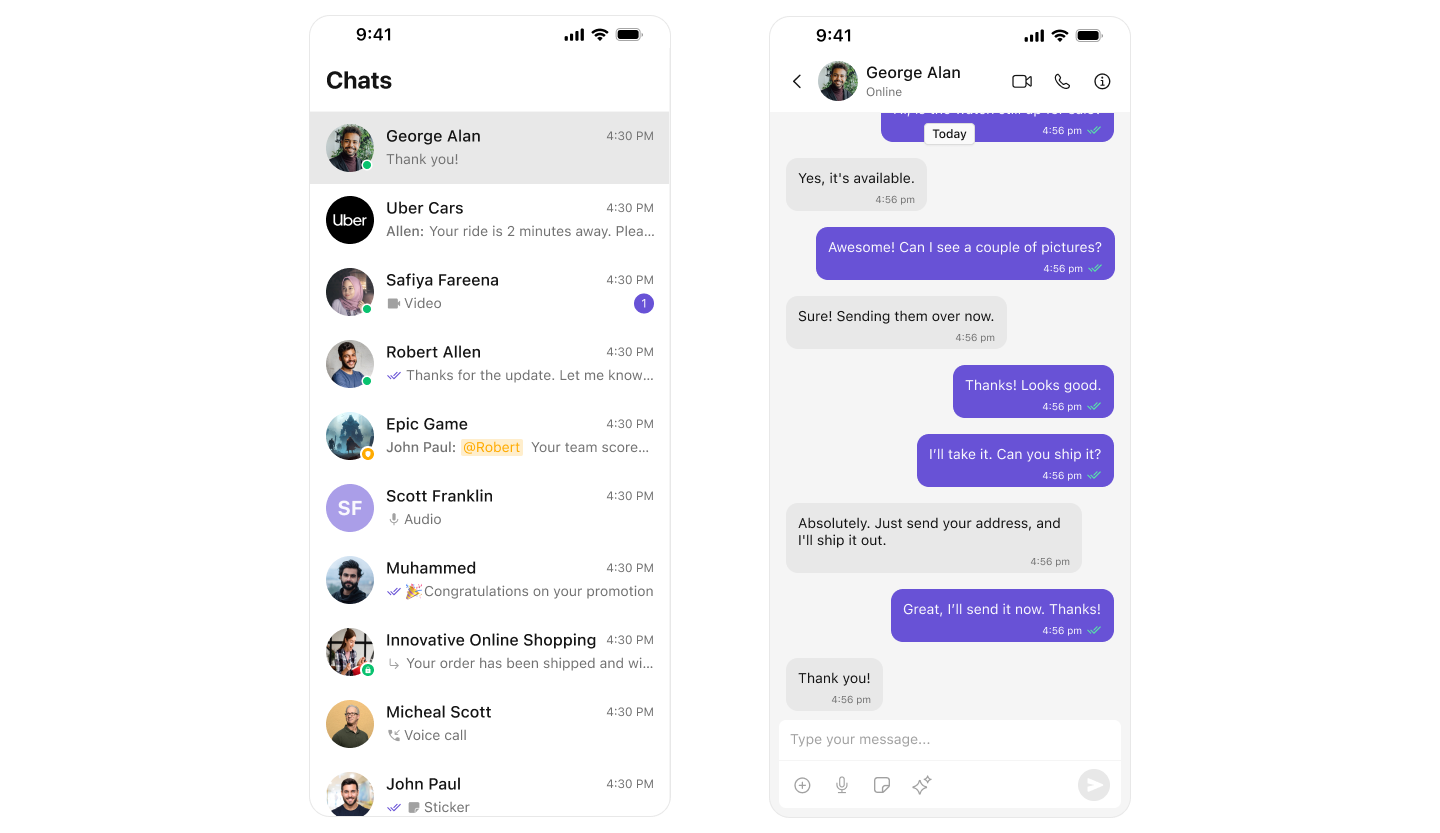
1️⃣ Conversation List + Message View
Best for: Applications that need a two-panel layout, such as large screen chat interfaces
Features:
- Two-panel layout – Displays the conversation list on the left and the active chat window on the right.
- One-to-one & group conversations – Seamless switching between private and group chats.
- Multiple conversations – Effortlessly switch between different chat windows.
- Easy navigation – Intuitive UI for finding and accessing chats quickly.
- Tap-to-view on mobile – Tapping a conversation opens the Message View, optimizing space.
- Real-time updates – Auto-refreshes messages and conversation lists.
- Message sync – Ensures messages stay updated across all sessions and devices.
Recommended for:
- Apps requiring a rich user experience with seamless navigation
- Platforms supporting both individual and group messaging
- Apps needing a tap-to-open message view
Integrate Conversation List + Message
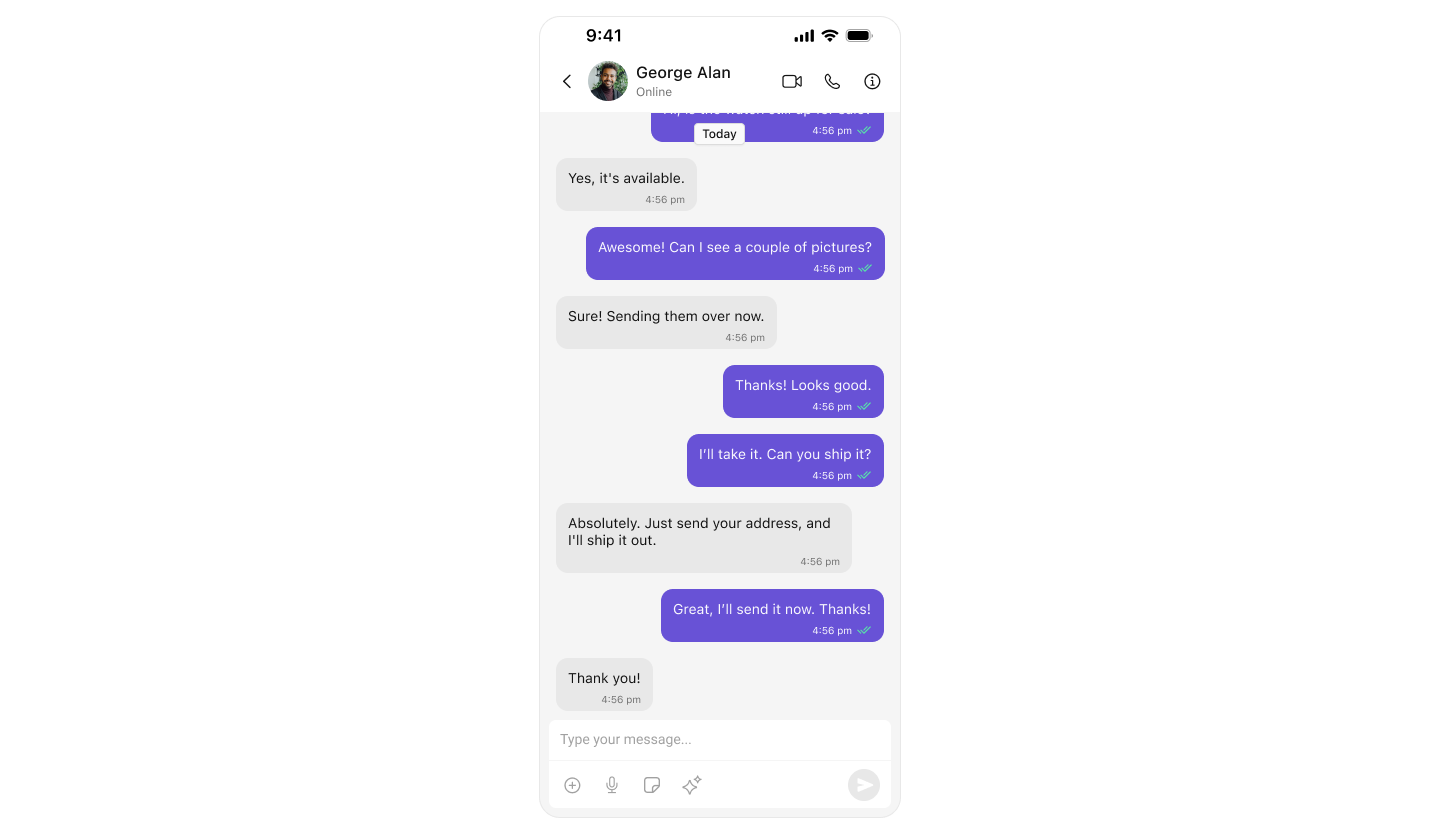
2️⃣ One-to-One/Group Chat
Best for: Apps that require a focused, direct messaging experience without a sidebar.
Features:
- Dedicated chat window – Ideal for one-on-one or group messaging.
- No conversation list – Users directly enter the chat without navigating through a list.
- Supports both One-to-One and Group Chats – Easily configurable with minor code modifications.
- Optimized for mobile – Full-screen chat experience without distractions.
- Seamless real-time communication – Auto-updates messages for a smooth experience.
- Ideal for support chat or community-based messaging.
Recommended for:
- Support chat applications – Direct user-agent communication.
- Apps focusing on direct messaging – No distractions from other conversations.
- Community or group chat applications – A structured way to interact in groups.
- Mobile-first applications – Designed for compact and dedicated messaging experiences.
Integrate One-to-One/Group Chat
3️⃣ Tab-Based Chat Experience
Best for: Apps that need a structured, multi-feature navigation system for seamless interaction between chats, calls, users, and settings.
Features:
- Tab Navigation – Easily switch between Chat, Call Logs, Users, and Settings.
- Dedicated Chat Window – Full-screen messaging experience for focused communication.
- No Sidebar – Unlike multi-panel UI, this design prioritizes individual interactions.
- Unified Experience – Users can seamlessly manage conversations, call history, and settings from a single interface.
- Scalable for future features – Easily extend to include more functionalities such as notifications or contact management.
- Optimized for larger screens – Ensures a smooth experience across different screen sizes.
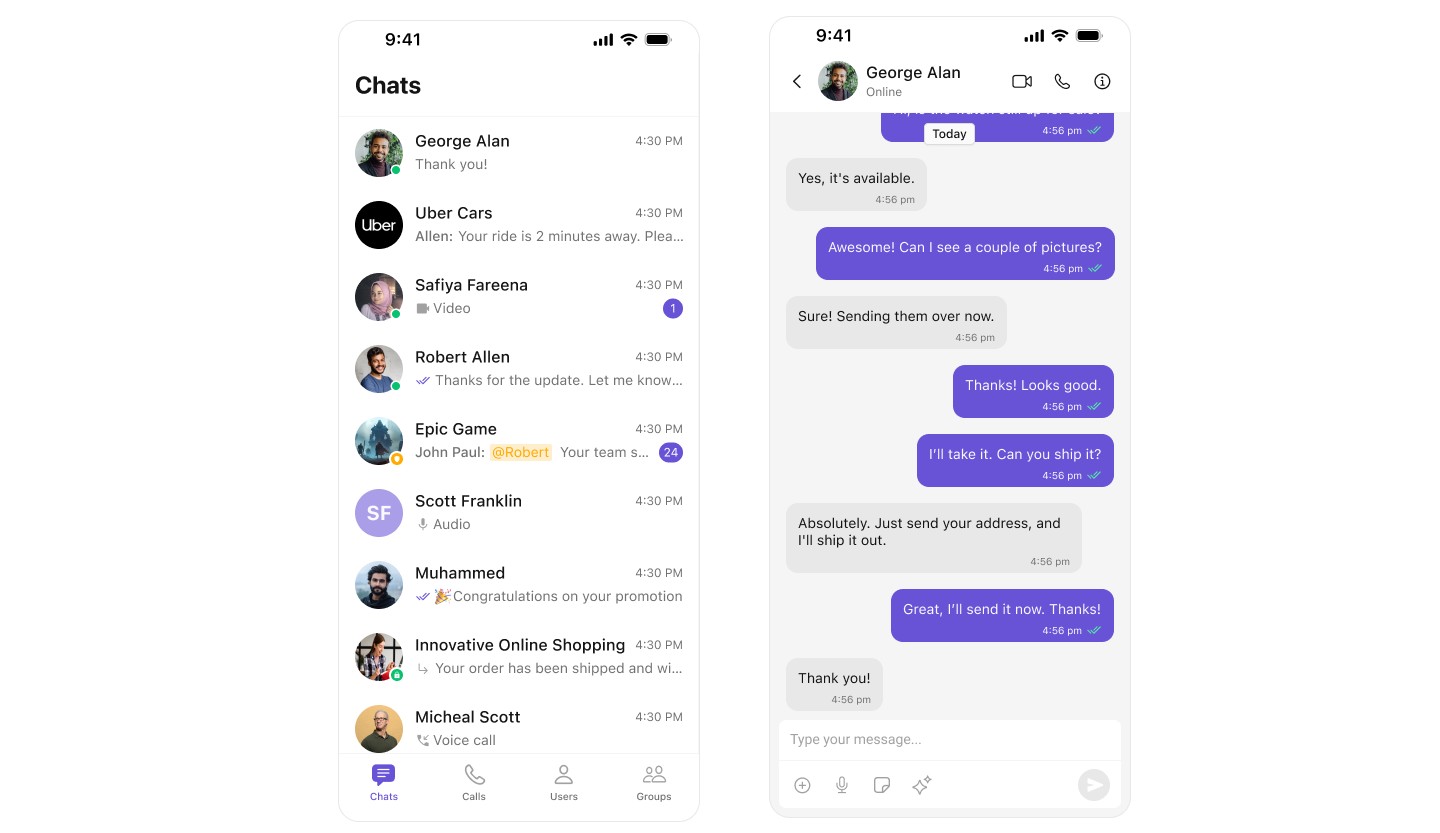
Recommended for:
- Apps requiring structured navigation – Clearly separate chat, calls, and settings.
- Multi-feature chat apps – Supporting different functionalities in an organized way.
- Mobile-first applications – Ideal for apps needing tab-based UI for easy access to features.
- Support & enterprise chat solutions – Perfect for help desks, business chat platforms, and customer support apps.
Build Your Own Chat Experience
Best for: Developers who need complete control over their chat interface, allowing customization of components, themes, and features to align with their app’s design and functionality. Whether you're enhancing an existing chat experience or building from scratch, this approach provides the flexibility to tailor every aspect to your needs.
Recommended for:
- Apps that require a fully customized chat experience.
- Developers who want to extend functionalities and modify UI components.
- Businesses integrating chat seamlessly into existing platforms.
Key Areas to Explore:
- iOS Sample App – Fully functional sample applications to accelerate your development.
- Core Features – Learn about messaging, real-time updates, and other essential capabilities.
- Components – Utilize prebuilt UI elements or customize them to fit your design.
- Themes – Adjust colors, fonts, and styles to match your branding.
- Build Your Own UI – Prefer a custom UI over our UI Kits? Explore our SDKs to create a tailored chat experience.
Next Steps
Now that you’ve selected your chat experience, proceed to the integration guide:
- Integrate Conversation List + Message
- Integrate One-to-One Chat
- Integrate Tab-Based Chat
- Advanced Customizations