Getting Started
Start Your First Conversation
CometChat UI Kit for Flutter is a package of pre-assembled UI elements crafted to streamline the creation of an in-app chat equipped with essential messaging functionalities. Our UI Kit presents options for light and dark themes, diverse fonts, colors, and extra customization capabilities.
CometChat UI Kit supports both one-to-one and group conversations. Follow the guide below to initiate conversations from scratch using CometChat Flutter UI Kit.
Prerequisites
Before installing the UI Kit, you need to create a CometChat application on the CometChat Dashboard, which includes all the necessary data for a chat service, such as users, groups, calls, and messages. You will require the App ID, AuthKey, and Region of your CometChat application when initializing the SDK.
i. Register on CometChat
- You need to register on the CometChat Dashboard first. Click here to sign up.
ii. Get Your Application Keys
- Create a new app
- Head over to the QuickStart or API & Auth Keys section and note the App ID, Auth Key, and Region.
Each CometChat application can be integrated with a single client app. Within the same application, users can communicate with each other across all platforms, whether they are on mobile devices or on the web.
iii. Platform & IDE Setup
- Flutter installed on your system.
- Android Studio or VS Code with configured Flutter/Dart plugins.
- Xcode & Pod (CocoaPods) for iOS
- An iOS device or emulator with iOS 12.0 or above.
- Android device or emulator with Android version 5.0 or above.
Getting Started
Step 1Create Flutter application project
To get started, create a new flutter application project.
Step 2
Add Dependency
1. Update Pubspec
To use this UI Kit in your Flutter project, you'll need to add the following dependency to the dependencies section of your pubspec.yaml file:
cometchat_chat_uikit: ^5.0.0
Final pubspec.yaml
  name: getting_started
  description: "A new Flutter project."

  publish_to: 'none' # Remove this line if you wish to publish to pub.dev

  version: 1.0.0+1

  environment:
    sdk: ^3.5.3

  dependencies:
    flutter:
      sdk: flutter

    cometchat_chat_uikit: ^5.0.0
    cupertino_icons: ^1.0.8

  dev_dependencies:
    flutter_test:
      sdk: flutter

    flutter_lints: ^4.0.0


  flutter:
    uses-material-design: true
2. Android App Setup
If your Flutter project’s compileSdk version is not set to 35, update it in your Android project configuration. You’ll find this setting in the build.gradle file located at android/app/build.gradle
android {
    namespace = "com.example.getting_started"
    compileSdk = 35
    ndkVersion = flutter.ndkVersion
    // Other configurations...
This ensures compatibility with the latest Android SDK features and prevents build issues.
3. Update iOS Podfile
In your Podfile (located at ios/Podfile), update the minimum iOS version your project supports to 12.0:
platform :ios, '12.0'
- Import CometChat UIKit In your Dart code, import the CometChat UIKit package to access its features. Add the following import statement to your main.dart file:
import 'package:cometchat_chat_uikit/cometchat_chat_uikit.dart';
Step 3
Initialize & Login UIkit
To start using the UI Kit, you first need to initialize and log in. Follow the steps below to get started:
-
Initialization
Call theInitmethod to set up the necessary configurations for CometChat in your app. This step should be done before invoking any other methods from CometChat UI Kit or SDK. -
User Login
Once initialized, use thelogin()method to authenticate the user. This method will return a User object containing all relevant user details. For testing purposes, you can use the following pre-generated users:cometchat-uid-1cometchat-uid-2cometchat-uid-3cometchat-uid-4cometchat-uid-5
For more details, refer to the documentation on Init and Login.
After importing the CometChat UIKit, initialize it with your app credentials and log in the user with cometchat-uid-1 upon successful initialization:
 UIKitSettings uiKitSettings = (UIKitSettingsBuilder()
      ..subscriptionType = CometChatSubscriptionType.allUsers
      ..autoEstablishSocketConnection = true
      ..region = "REGION"//Replace with your App Region
      ..appId = "APP_ID" //Replace with your App ID
      ..authKey = "AUTH_KEY" //Replace with your app Auth Key
    ).build();

    CometChatUIKit.init(uiKitSettings: uiKitSettings,onSuccess: (successMessage) async {
      debugPrint('CometChat Initialized');
      CometChatUIKit.login("cometchat-uid-1",onSuccess: (s) {
        debugPrint('CometChat LoggedIn success');
      }, onError: (e) {
        debugPrint('CometChat LoggedIn error');
      });
    }, onError: (error) {
    });
Make sure to replace the APP_ID with your CometChat appId, AUTH_KEY with your CometChat app auth key and REGION with your app region in the above code.
Step 4
Rendering Conversation Component
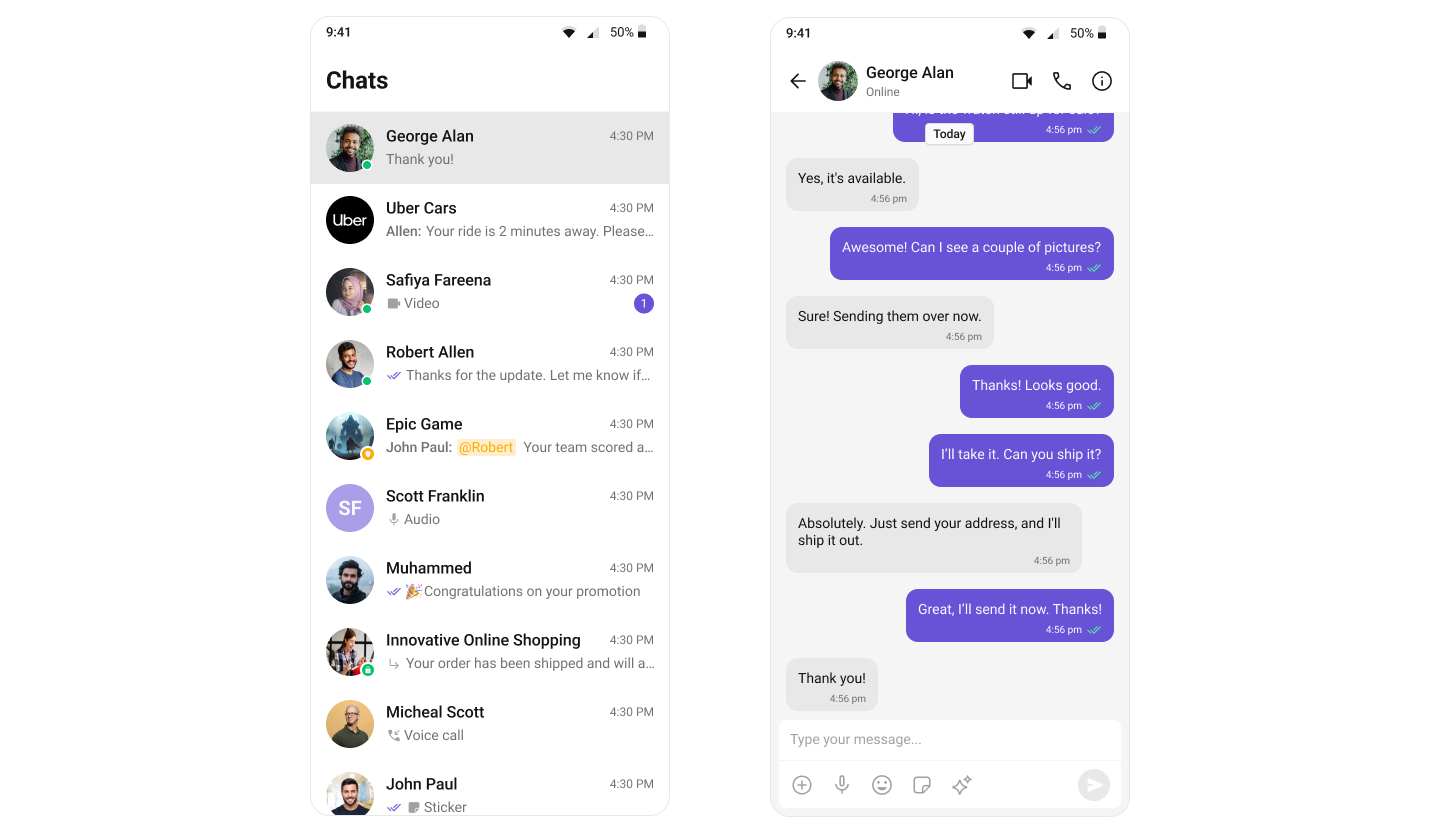
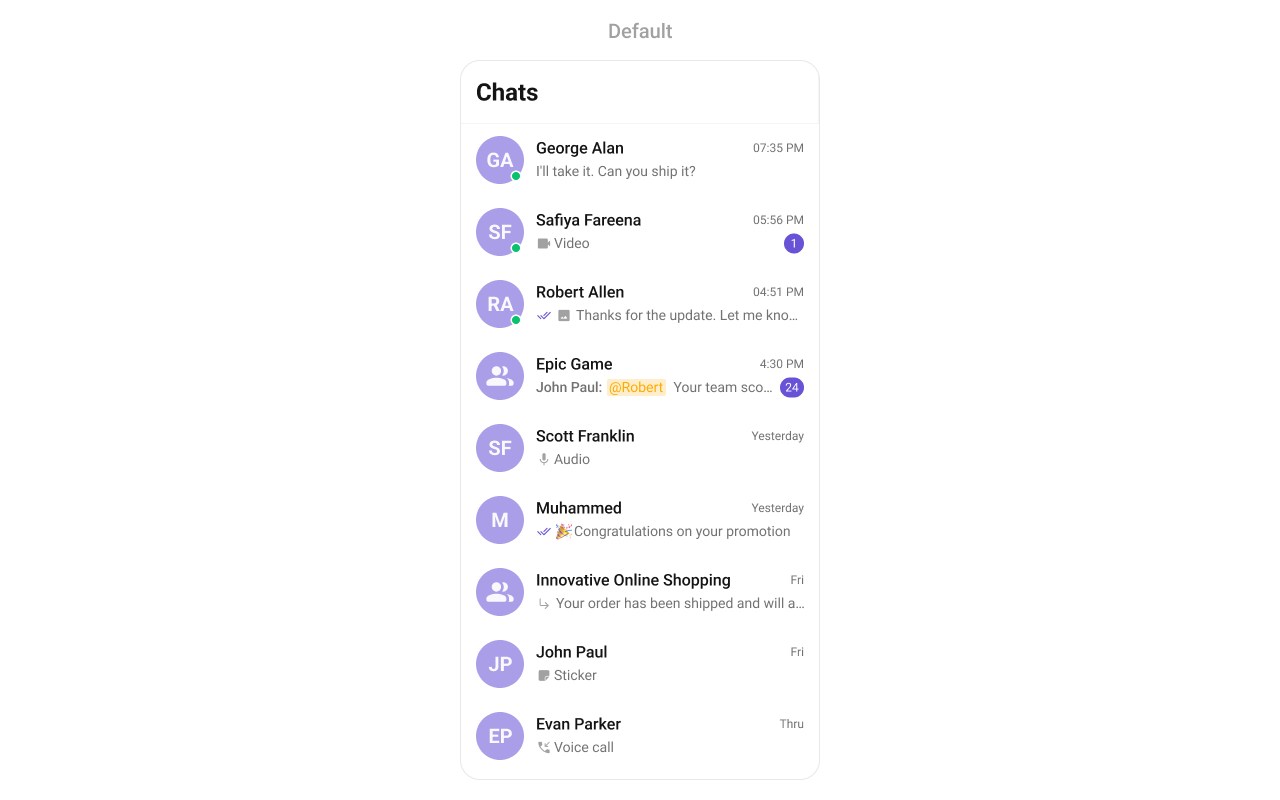
The Conversations component is a Component that displays all conversations related to the currently logged-in user.
Below are the steps to render the Conversations component:
-
Add the CometChatConversations widget to your build method.
main.dart
Widget build(BuildContext context) {
return Scaffold(
body: SafeArea(child: CometChatConversations(
showBackButton: true,
))
);
} -
Handle Conversation Click Events To navigate to the Message Screen when a conversation is tapped, set up the
onItemTapinside the CometChatConversations widget as shown below:main.dart
Widget build(BuildContext context) {
return Scaffold(
body: SafeArea(child: CometChatConversations(
showBackButton: true,
onItemTap: (conversation){
debugPrint('onItem Tap');
Navigator.push(
context,
MaterialPageRoute(
builder: (context) => MessagesScreen(
user: conversation.conversationWith is User
? conversation.conversationWith as User
: null,
group: conversation.conversationWith is Group
? conversation.conversationWith as Group
: null
),
),
);
},
))
);
}warningYou need to create a
MessagesScreen.dartfile for the navigation to work correctly. This file should contain the CometChatMessages widget to display messages for the selected conversation.
Below is the complete main.dart file:
import 'package:flutter/material.dart';
import 'package:cometchat_chat_uikit/cometchat_chat_uikit.dart';
import 'MessagesScreen.dart';
void main() {
runApp(const MyApp());
}
class MyApp extends StatelessWidget {
const MyApp({super.key});
Widget build(BuildContext context) {
return MaterialApp(
title: 'CometChat UI Kit',
theme: ThemeData(
colorScheme: ColorScheme.fromSeed(seedColor: Colors.deepPurple),
useMaterial3: true,
),
home: const MyHomePage(),
);
}
}
class MyHomePage extends StatefulWidget {
const MyHomePage({super.key});
State<MyHomePage> createState() => _MyHomePageState();
}
class _MyHomePageState extends State<MyHomePage> {
void initState() {
super.initState();
Future.microtask(() => initializeCometChat());
}
bool isLoggedIn = false;
/// Initializes CometChat UI Kit and logs in the user
void initializeCometChat() async {
UIKitSettings uiKitSettings = (UIKitSettingsBuilder()
..subscriptionType = CometChatSubscriptionType.allUsers
..autoEstablishSocketConnection = true
..region = "REGION" // Replace with your App Region
..appId = "APP_ID" // Replace with your App ID
..authKey = "AUTH_KEY" // Replace with your Auth Key
).build();
try {
await CometChatUIKit.init(uiKitSettings: uiKitSettings);
debugPrint('✅ CometChat Initialized');
await CometChatUIKit.login(
"cometchat-uid-1",
onSuccess: (user) {
debugPrint('✅ Login Successful');
setState(() {
isLoggedIn = true;
});
},
onError: (error) => debugPrint('❌ Login Failed: $error'),
);
} catch (e) {
debugPrint('❌ CometChat Initialization Failed: $e');
}
}
Widget build(BuildContext context) {
return Scaffold(
body: SafeArea(
child: (isLoggedIn == false)
? const Center(child: CircularProgressIndicator()) :
CometChatConversations(
showBackButton: true,
onItemTap: (conversation) {
debugPrint('📩 Conversation Selected');
Navigator.push(
context,
MaterialPageRoute(
builder: (context) => MessagesScreen(
user: conversation.conversationWith is User
? conversation.conversationWith as User
: null,
group: conversation.conversationWith is Group
? conversation.conversationWith as Group
: null,
),
),
);
},
),
),
);
}
}
Step 5
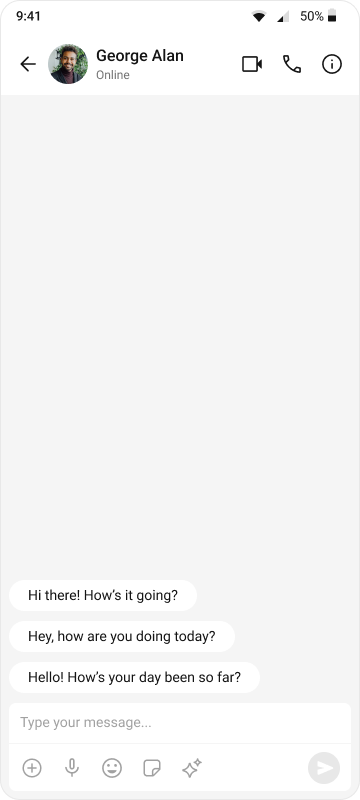
Rendering the Messages Component
To achieve full messaging functionality in MessagesScreen, you need to combine the following three components:
Below is the code snippet for MessagesScreen.dart:
import 'package:flutter/material.dart';
import 'package:cometchat_chat_uikit/cometchat_chat_uikit.dart';
class MessagesScreen extends StatefulWidget {
final User? user;
final Group? group;
const MessagesScreen({Key? key, this.user, this.group}) : super(key: key);
State<MessagesScreen> createState() => _MessagesScreenState();
}
class _MessagesScreenState extends State<MessagesScreen> {
Widget build(BuildContext context) {
return Scaffold(
appBar: CometChatMessageHeader(
user: widget.user,
group: widget.group,
),
body: SafeArea(
child: Column(
children: [
Expanded(
child: CometChatMessageList(
user: widget.user,
group: widget.group,
),
),
CometChatMessageComposer(
user: widget.user,
group: widget.group,
),
],
),
),
);
}
}