This tutorial is outdated. We're currently working on an updated version. In the meantime, for instructions on building a chat app using CometChat, please visit our documentation.
The surge in usages of telehealth apps has exploded since the Covid-19 pandemic shocked the world in early 2020. The CDC reported a 154% increase in telehealth visits during the last week of March 2020 compared with the same period in 2019, and it was then estimated that over 1 billion telehealth virtual “visits” would be completed by the end of 2020, with 900 million or more directly tied to the fight against COVID-19. (See our article on telehealth trends for more fascinating stats surrounding the fast, widespread adoption of telehealth usage.)
Experts predict that the widespread adoption of telehealth apps is here to stay. So if you're planning on building one, there's no better time.
One critical thing to consider when building a telehealth app is HIPAA compliance. What does that mean?
The Health Insurance Portability and Accountability Act (HIPAA) sets the standard for sensitive patient data protection. Companies that deal with protected health information (PHI) must have physical, network, and process security measures in place and follow them to ensure HIPAA Compliance.
For more information, see our article Everything You Need to Know About HIPAA Compliance in 2021.
CometChat makes it easy to add HIPAA compliant chat, voice and video calling to your telehealth app. In this step-by-step tutorial, we'll show you how easy it is.
Building an OhMD clone
For this tutorial, we'll be building a clone of OhMD, a telehealth app that allows doctors and patients to voice, video and text chat with each other. The OhMD app looks like this...
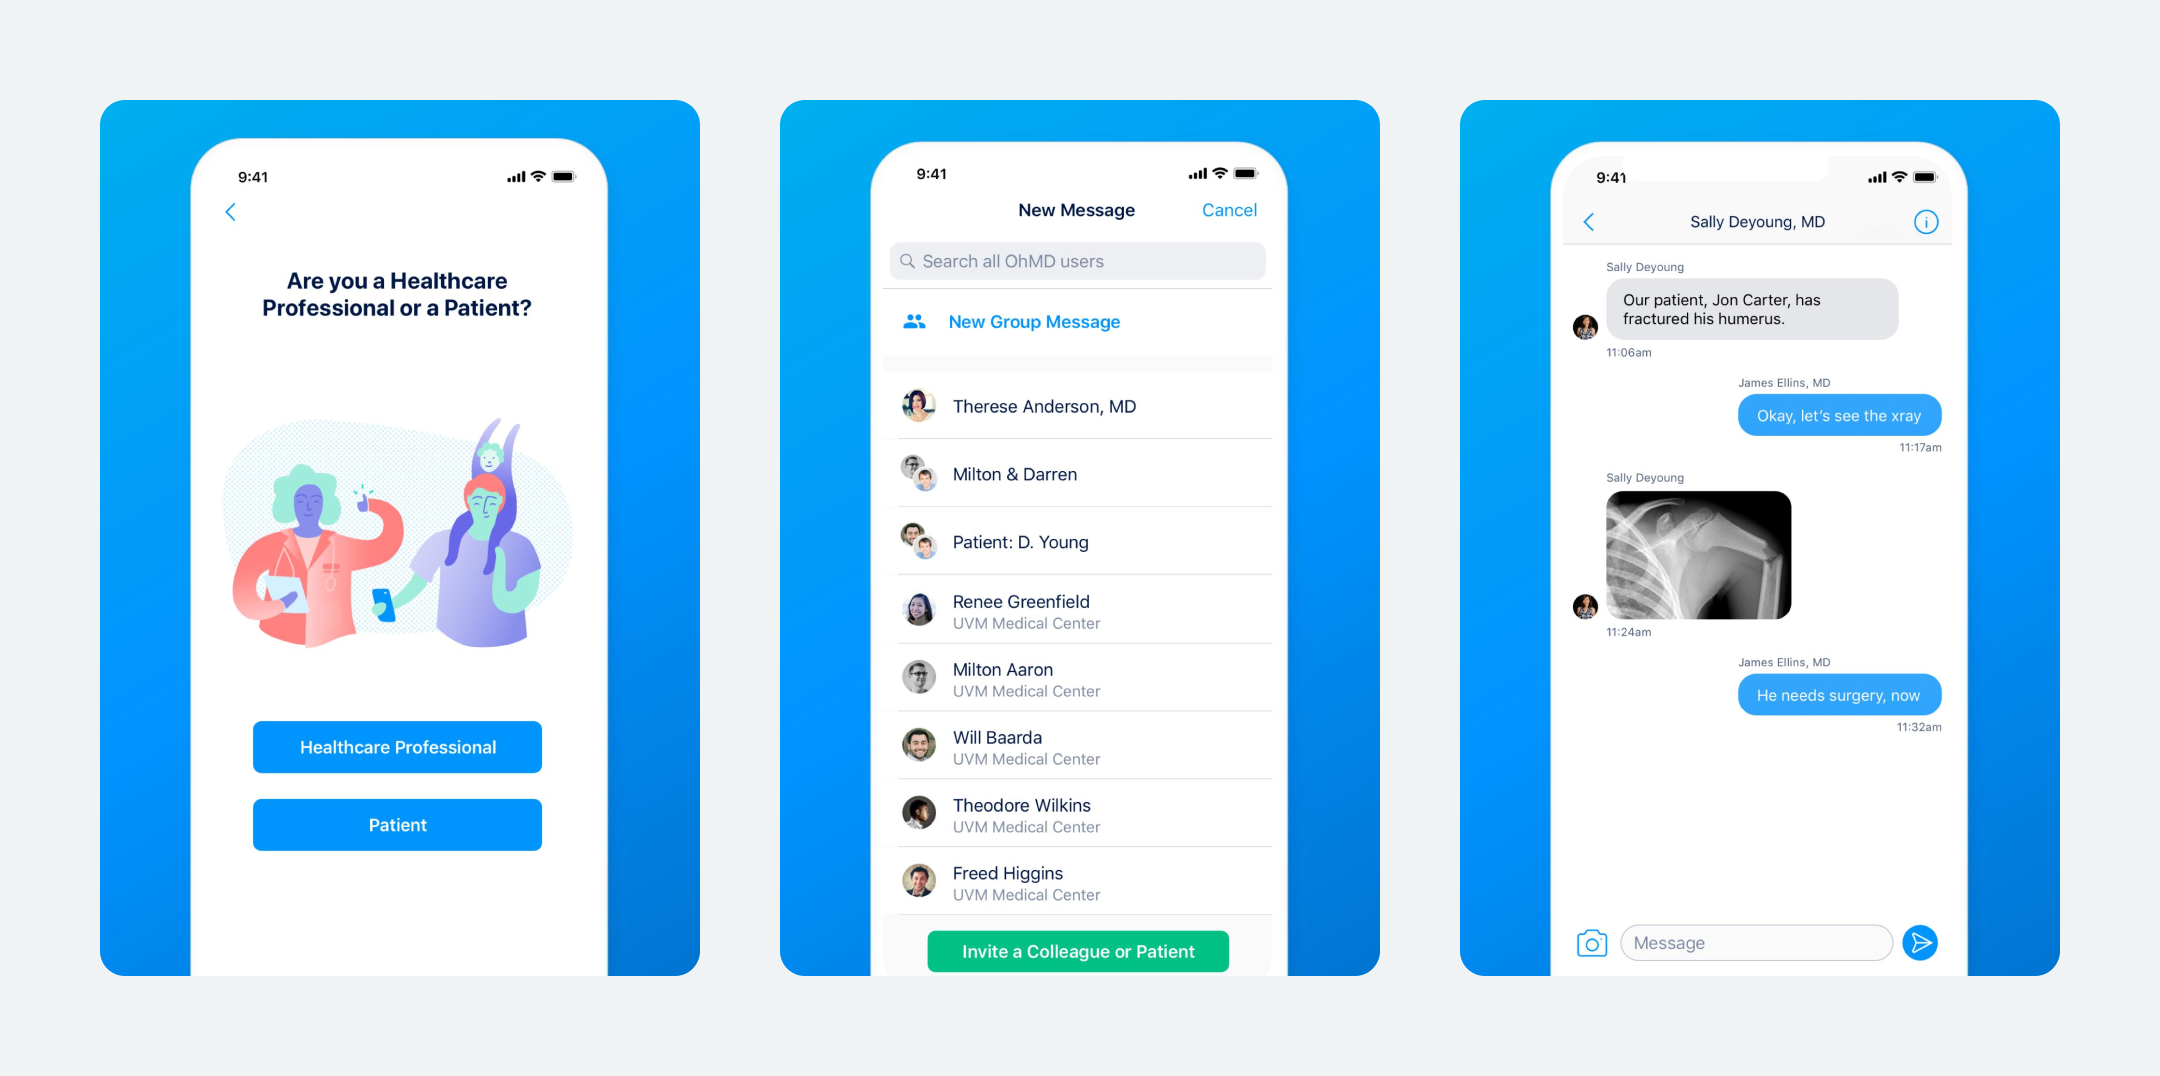
We would be trying to replicate the screens and the user flow of this app.
The overall working of the app & features will include...
User login/registration
A way for end users to login and register either as a patient or a doctor
Ability for doctors to invite patients to the platform by sending them an invite code. The patient would use the same to login and chat with a specific doctor.
Visibility
When a patient logs in, they can only chat with the doctors (who have invited them) and they can view all conversations in the conversations tab. For doctors, they can view all patients in the conversations tab and chat via voice, text and video.
We'll be using...
Firebase Auth for authentication
Firebase Cloud Firestore for back-end
CometChat SDK Methods for retrieving data
CometChat UIKit for easy UI implementation
CometChat APIs
We’ll start with a new project and go step by step from adding and configuring CometChat and Firebase components for the back-end to building our OhMD clone.
Let’s get into the code and I’ll show you how CometChat’s ready structure makes this development a breeze.
Step 1: Requisites for the app
To implement the patient invite logic like OhMD, we need to have a back-end in place along with CometChat. We would be using Firebase for our back-end database storage needs as well as for user authentication. Let’s setup Firebase and CometChat in our app…
Setting up Firebase —
If you are new to Firebase, I’d recommend exploring the suite of products that Firebase provide for the app developers. In this app, we would be using 2 of the Firebase products. Firebase Auth for user registration and sign-in. Firebase Cloud Firestore to store our doctors and patients in a cloud database.
In an actual production application, the back-end database would be very vast comprising of a lot of tables. But we’ll keep it simple for this tutorial. We would be needing 3 tables viz. users, doctors & patients.
Firebase Auth will provide us with a users table. So in Cloud Firestore, we’ll just implement the Doctors and Patient Tables. Now, keep in mind - Firebase Cloud Firestore is a No-SQL DB, hence the terms & features are different. Instead of a table, we’d be calling them as Collections. So, it would be doctors collection and patients collection. Each entry within a collection is called a document.
The parameters that we’d be saving in doctors and patients document would be -
Doctors - [id, name, mobile, email, referral_code]
Patients - [id, name, mobile, email, invite_code]
The “id” parameter would contain the user ID from the Firebase Auth. This will help us fetch appropriate entries from the doctor and patient collections based on the Auth user id.
We won’t be going deep into setting up the entire Firebase Auth and Cloud Firestore from scratch here. Instead, I’ll share the official documentation links which will help you configure yours.
For Firebase Auth, we’ll be using Email-Password based authentication. Here are the links which will help you set up your app on Firebase and enable Auth and Cloud Firestore.
Setting up CometChat —
When I first started building apps with CometChat, I got stuck at various place unaware about the basic working and concepts how CometChat works. Don’t be like me
Before starting with CometChat, I’d recommend you to take a look at the Key Concepts page. The concepts help you make decisions concerning your application’s flow.
Before diving into the code, we’ll need to setup CometChat in our application. CometChat Quick Start document does a wonderful job explaining the steps in detail.
We’ll outline the steps from the above document -
Once you have added all the dependencies in your project, you’d need to initialize CometChat in your AppDelegate file. You can do it using the below code -
Step 2: Implement Doctor Signup & Login
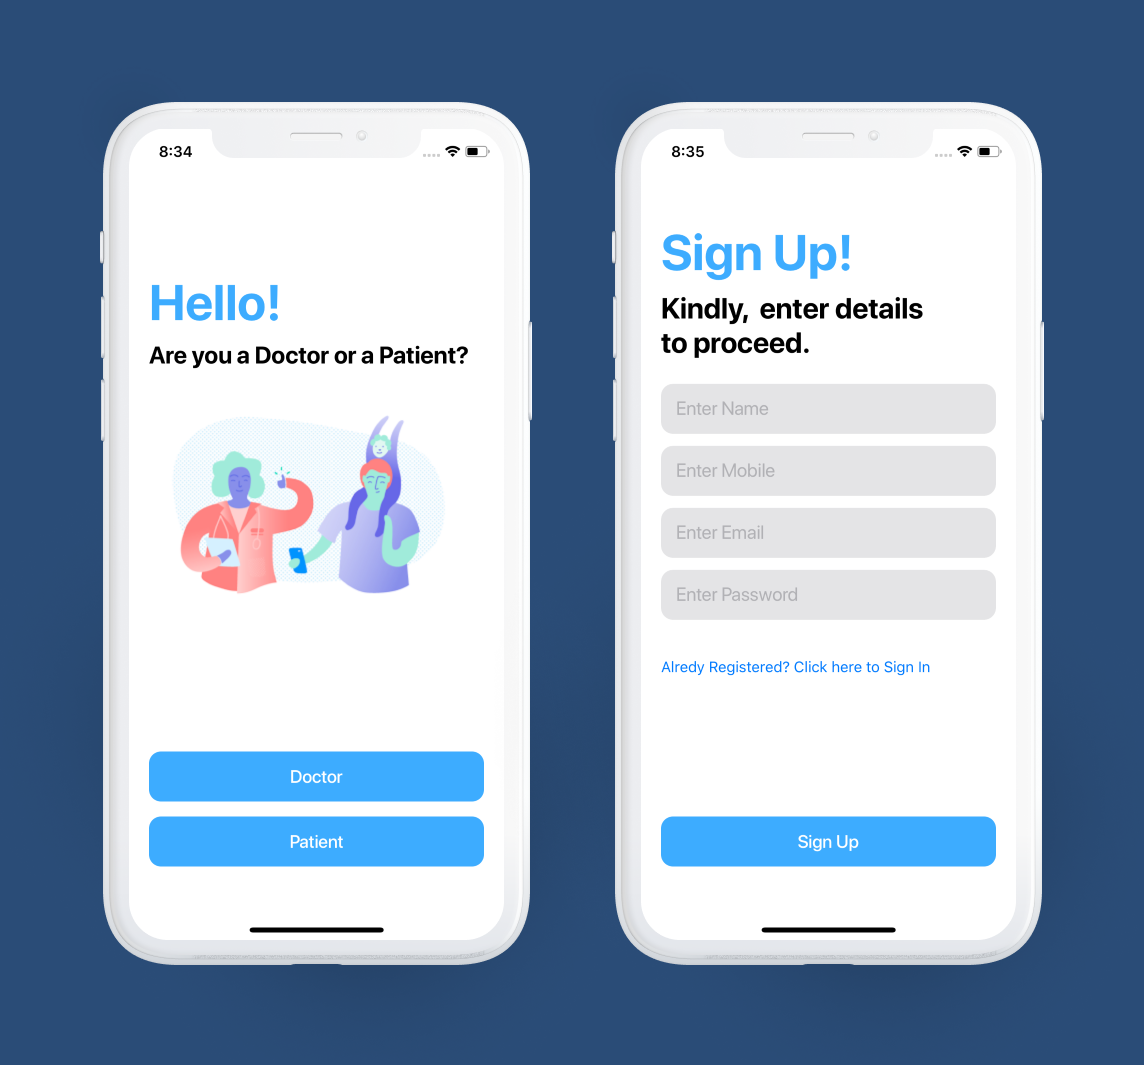
The first screen of our app would be a user selection screen. Wherein we would be asking the users to define whether they would be signing up as Doctors or Patients, just like OhMD app.
We’ll first see the Doctor registration and login flow.
Here’s the outline and explanation of the steps we would be implementing for our Doctor Signup.
Register the user in Firebase Auth
Since Firebase would be our main back-end, we would first register the user in our Firebase using Firebase Auth
Update the user’s name in Firebase Auth
While registering, the Firebase Auth function does not provide a way to submit the user name. Hence we would be doing that when we get a success response from Auth. (This step is optional. It would just help us to view our user’s names in Firebase console.)
Save the Doctor entry in Firebase Cloud Firestore
Once we register the doctor using Firebase Auth, its time to save the doctor in our Cloud Firestore database. One thing to note over here is, we would be generating a unique referral code for each doctor and would be saving that in the Doctor’s collection as well. This would help us later while inviting patients.
Register the User in Cometchat
Once the registration and saving the data in our primary back-end is completed, we would need to register the user in CometChat using the createUser SDK function.
Log the user in Cometchat
Once the user is registered in CometChat, we would be logging the user in CometChat via its login SDK function.
Let’s have a look at the code which implements the above-discussed points.
Note: Validations and Error handling have been skipped for the tutorial purpose. In the production application, we would need to handle these gracefully with alerts.
Step 3: Implement the “All Chats” Screen
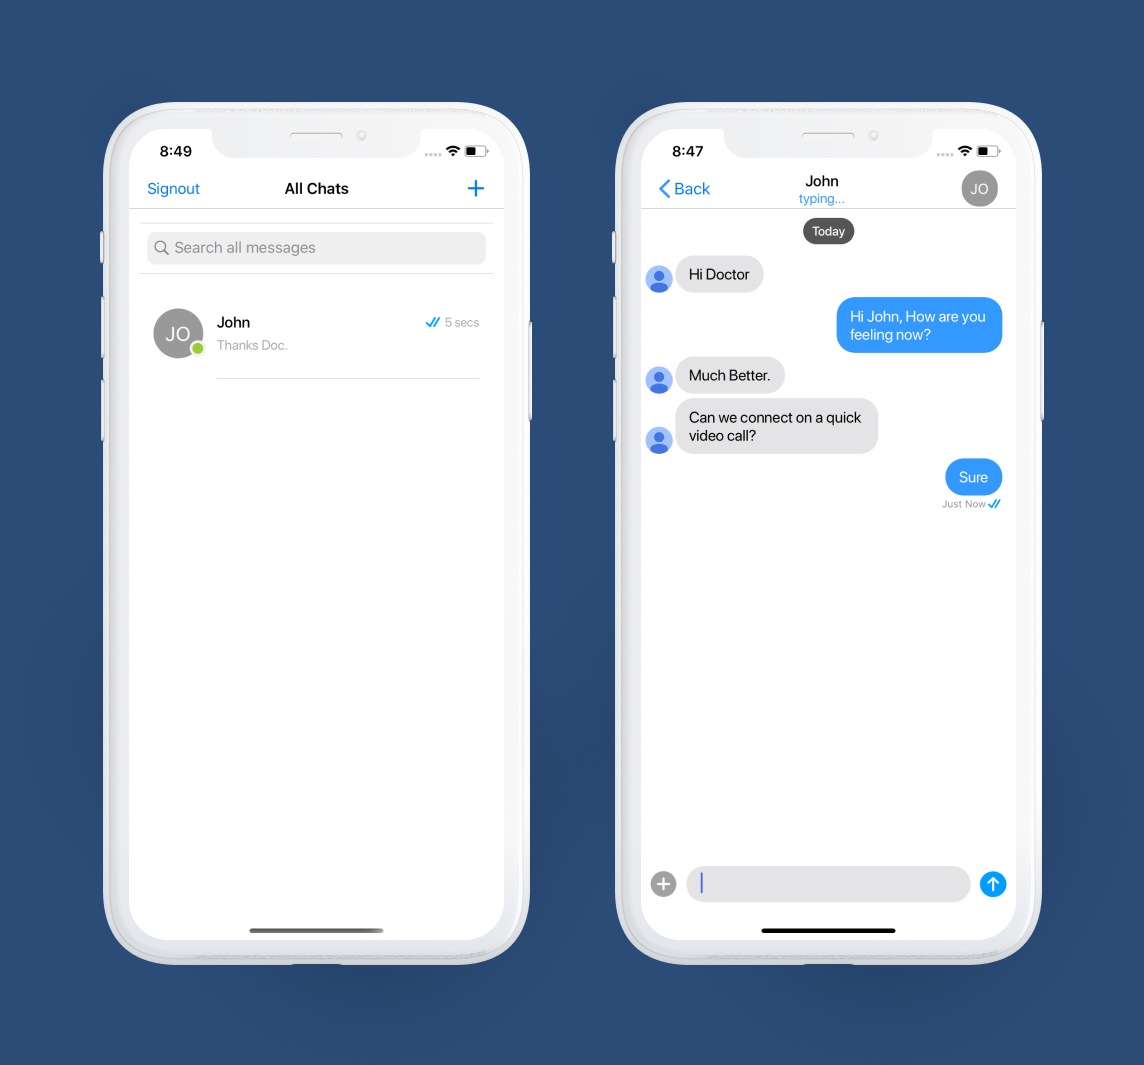
Once the doctor or the patient registers, they would be taken to the “All Chats” screen. Here, there would be a list of all the conversations.
Doctors would be able to see their conversations with all their patients. Patients would be able to see their active conversation with the doctor who invited them.
This conversations list would be fetched from CometChat.
Now, since we want our custom UI, we wouldn’t use CometChat’s ready-made Conversations Screen available in its UI Kit like we did in our previous tutorials. We’ll use CometChat’s SDK methods to fetch the conversation list and display them in our table view.
We’ll be doing 2 things here-
Use CometChatConversationView from its UI Kit Components library for the table view cell UI. We would register this view directly to our table view. This would save us some time creating the Cell UI by ourselves.
Fetch Conversations list by using CometChat’s ConversationRequest class.
(If you need to check the full list of parameters available in the Request builder class, you can find it here.)
Let’s check the code…
You can view the final updated Conversations View Controller here.
Step 4: Implement Users Screen
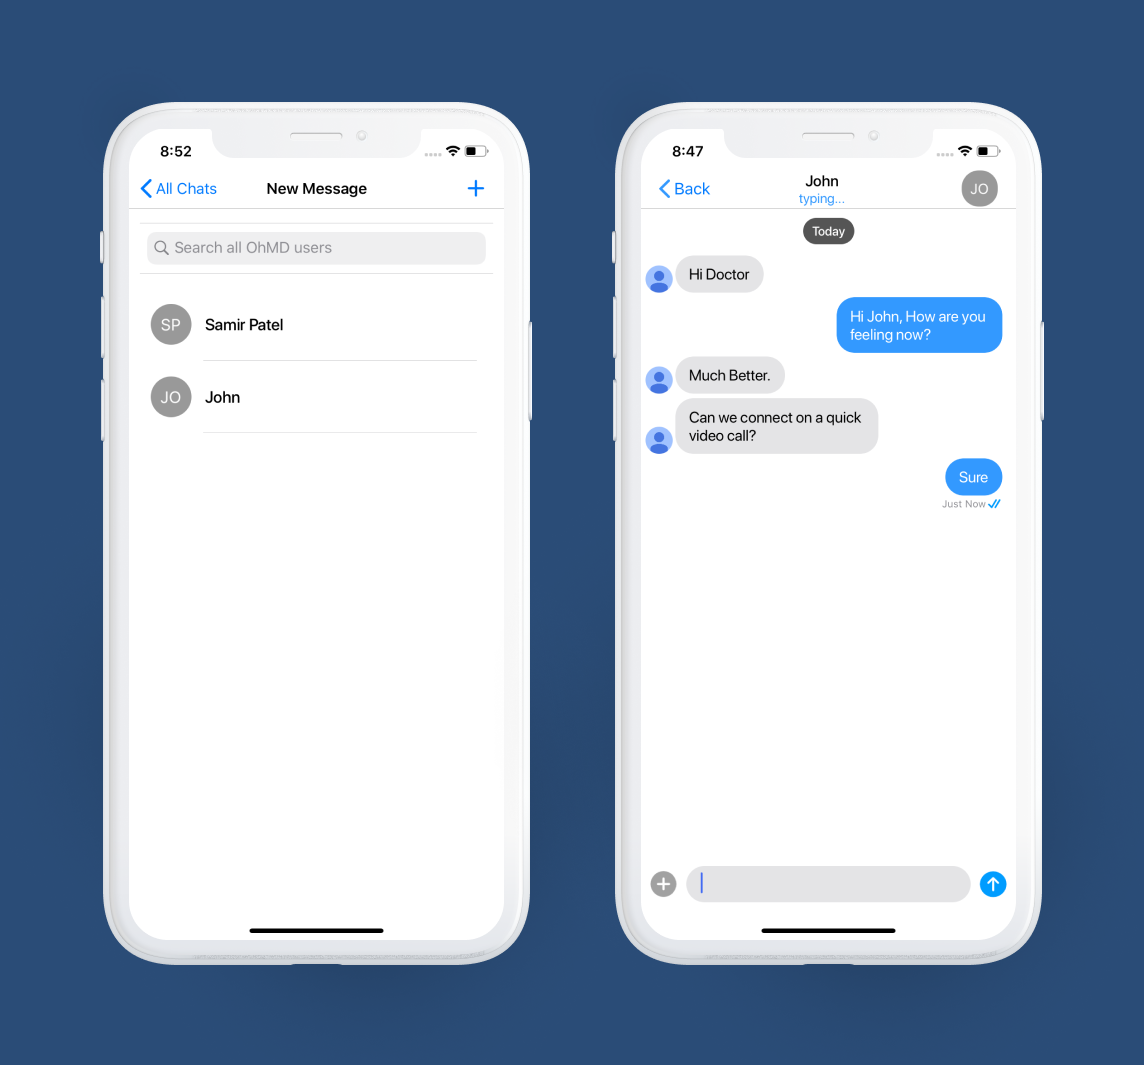
For doctors, this screen would contain a list of all the patients, a doctor would choose from to chat with. For Patients, they would see the list of doctors they would be able to chat with.
We would be fetching this user list from CometChat.
This page would also have a button “Invite Patient.” We would hide and show this button based on the user type. If the user is a doctor, we would be showing this button, else we would hide it.
Now, since we want our custom UI, we wouldn’t use CometChat’s ready-made Users Screen available in its UI Kit. We’ll use CometChat’s SDK methods to fetch the user list and display them in our table view.
We’ll be doing 2 things here-
Use CometChatUserView from its UI Kit Components library for the table view cell UI. We would register this view directly to our table view. This would save us some time creating the Cell UI by ourselves.
Fetch Users list by using CometChat’s UsersRequest class.
An important point to be noted here is - we would be enabling “friendsOnly” parameter of the UsersRequestBuilder. This would be so that the Doctors would be able to see only those patients whom they have invited and vice versa. We would be setting this friends value in CometChat when we will see the Patient Registration part in the latter part of this tutorial.
(If you need to check the full list of parameters available in the Request builder class, you can find it here.)
Let’s check the code…
You can view the final updated Users View Controller here.
Step 5: Implement Invite Patients Screen
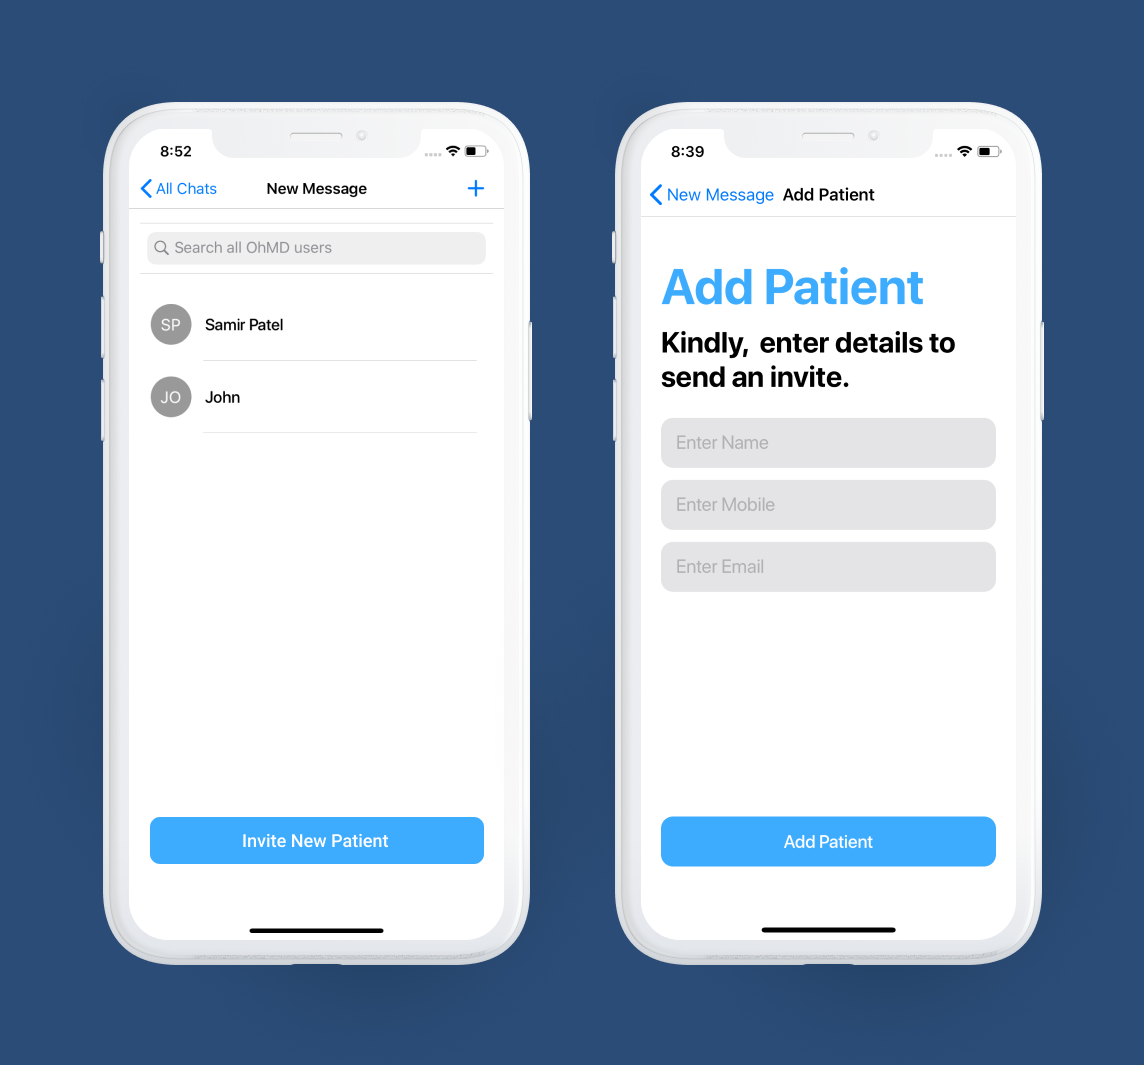
This screen would be visible only for doctors. The doctor would be adding the patient’s name, email and mobile for inviting them.
We would be showing an SMS prompt with a predefined message. Doctors can send that SMS from their device itself.
The logical flow on this screen would be -
Get the logged in doctor’s referral code. This can be done in 2 ways - Either store the referral code in UserDefaults and fetch from there or you can fetch it via our Firebase back-end DB (Cloud Firestore). In this tutorial, we are using the back-end approach.
Save the patient info in Firebase Cloud Firestore along with the invite code info. The doctor’s referral code would be this patient’s invite code. We’ll be using this for comparison at the time of Patient registration.
Display a message view to allow doctors to send an invite SMS to the patient.
Let’s see the entire flow in code…
Step 6: Implement Patients Signup & Login
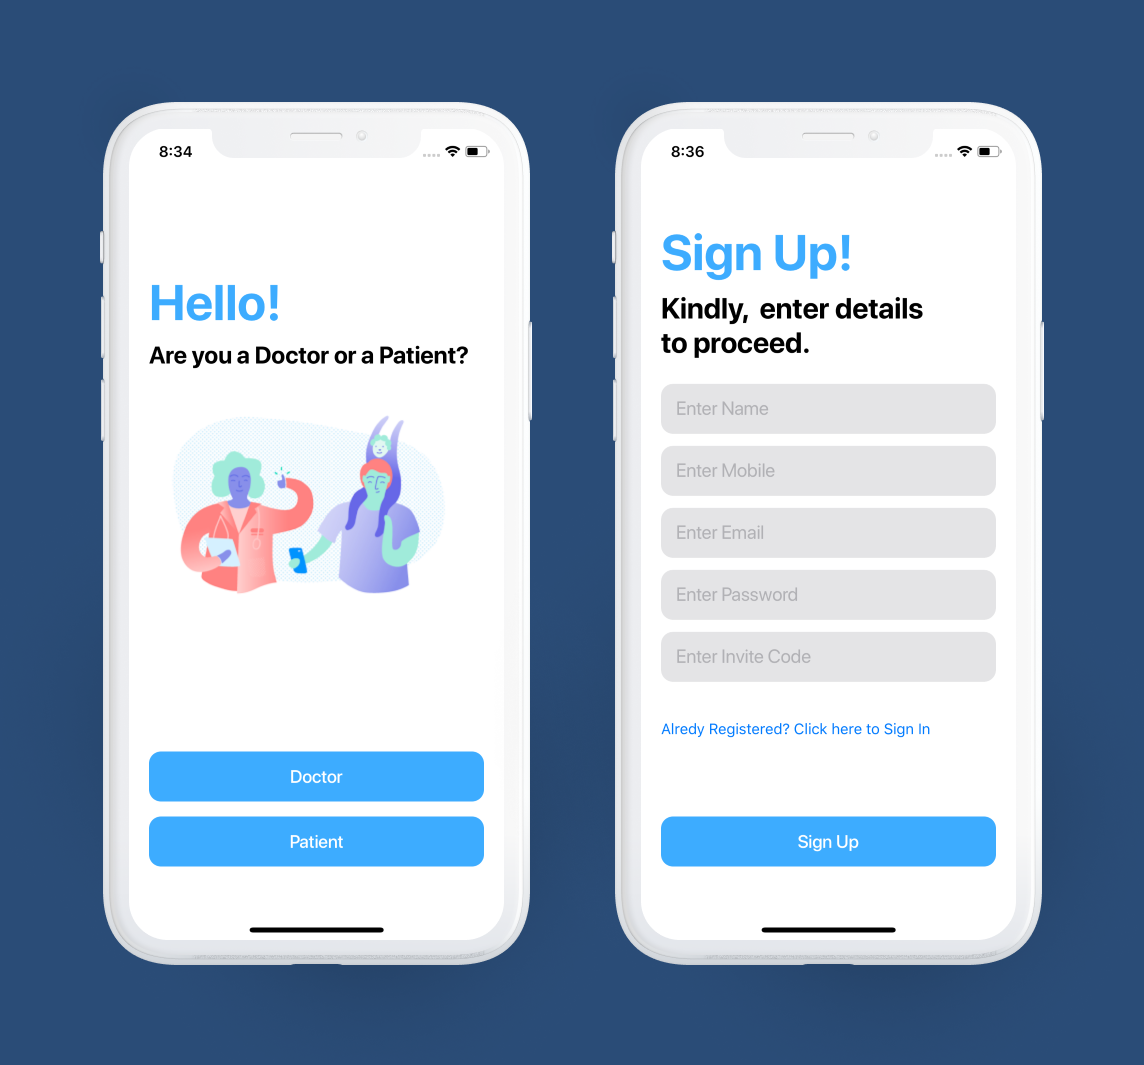
We would be reusing our Registration View Controller to implement Patient Signup. The flow would be managed based on a user type flag which would be passed from the app’s initial user type selection screen. Ideally, you would be saving this user type flag in UserDefaults so that it can be persisted and used later. For the tutorial purpose, we have just added the flag in AppDelegate.
Here’s the outline and explanation of the steps we would be implementing for our Patient Signup.
Fetch patient info from the Firebase back-end & match the invite code -
We are storing the patient info in our Firebase back-end when the doctor invites them. We would be fetching the patient info based on mobile number along with the invite-code required. We would match this invite code against the one entered by the user on the sign-up screen. If the code matches, we would proceed further with our registration flow.
Register User in Firebase Auth
Since Firebase would be our main back-end, we would first register the user in our Firebase using Firebase Auth. Since Firebase Auth function does not provide a way to submit the user name, we would be updating the user once it’s successfully registered. (Updating the name is optional. It would just help us to view our user’s names in Firebase console.)
Update the Patient entry in Firebase Cloud Firestore
Once we register the patient using Firebase Auth, its time to update the patient in our Cloud Firestore database. Remember that we had already created the patient entry in our patient’s collection when the doctor sent an invite. Now, we would just be updating the ID to map this patient collection entry with our Firebase Auth.
Register the User in Cometchat
Once the registration and saving the data in our primary back-end is completed, we would need to register the user in CometChat using the createUser SDK function.
Log the user in Cometchat
Once the user is registered in CometChat, we would be logging the user in CometChat via its login SDK function.
Map the Doctor and Patient as friends in CometChat
This is a very important step. Based on this the visibility of users would be restricted. The doctors would be able to see only those patients whom they have invited and the patients would only be able to see the doctor who has invited them. First, we would be fetching the doctor based on the unique referral code. Then we would call CometChat’s Add Friend API to map these users as friends in CometChat.
Let’s have a look at the code which implements the above-discussed points.
You can view the final updated Registration View Controller here.
Step 7: Implement Chat Screen
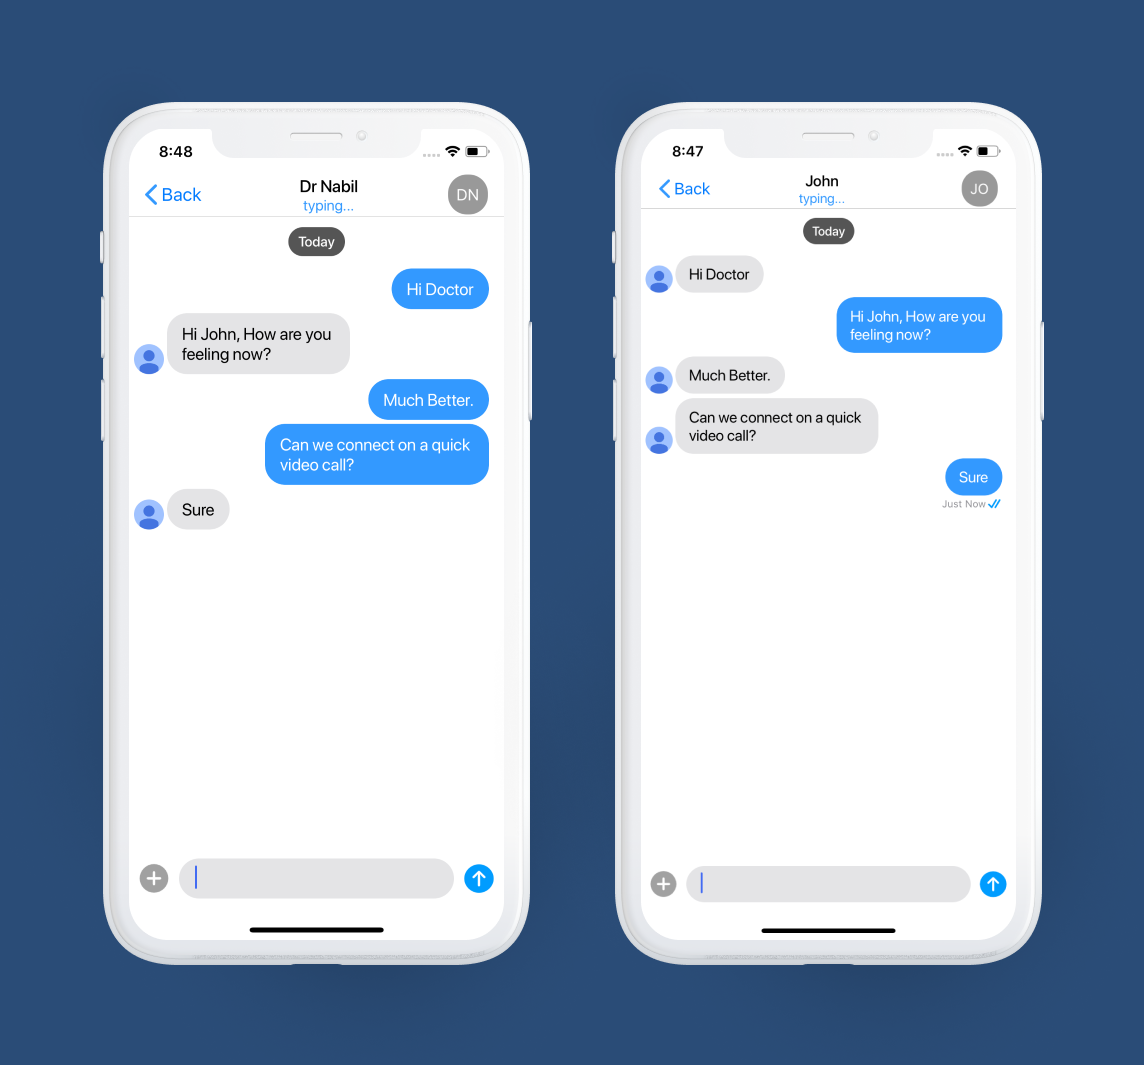
This step is very interesting. With CometChat’s UIKit, we don’t have to build this screen at all! Yes, you heard it right. We can directly use CometChatMessageList View Controller which is available in the UI Kit. We would just need to pass the CometChat user object while initiating this View Controller. Rest everything is being taken care of by CometChat itself.
Need proof? See for yourself… This simple function does it all for us.
Step 8: Implement Audio/Video call
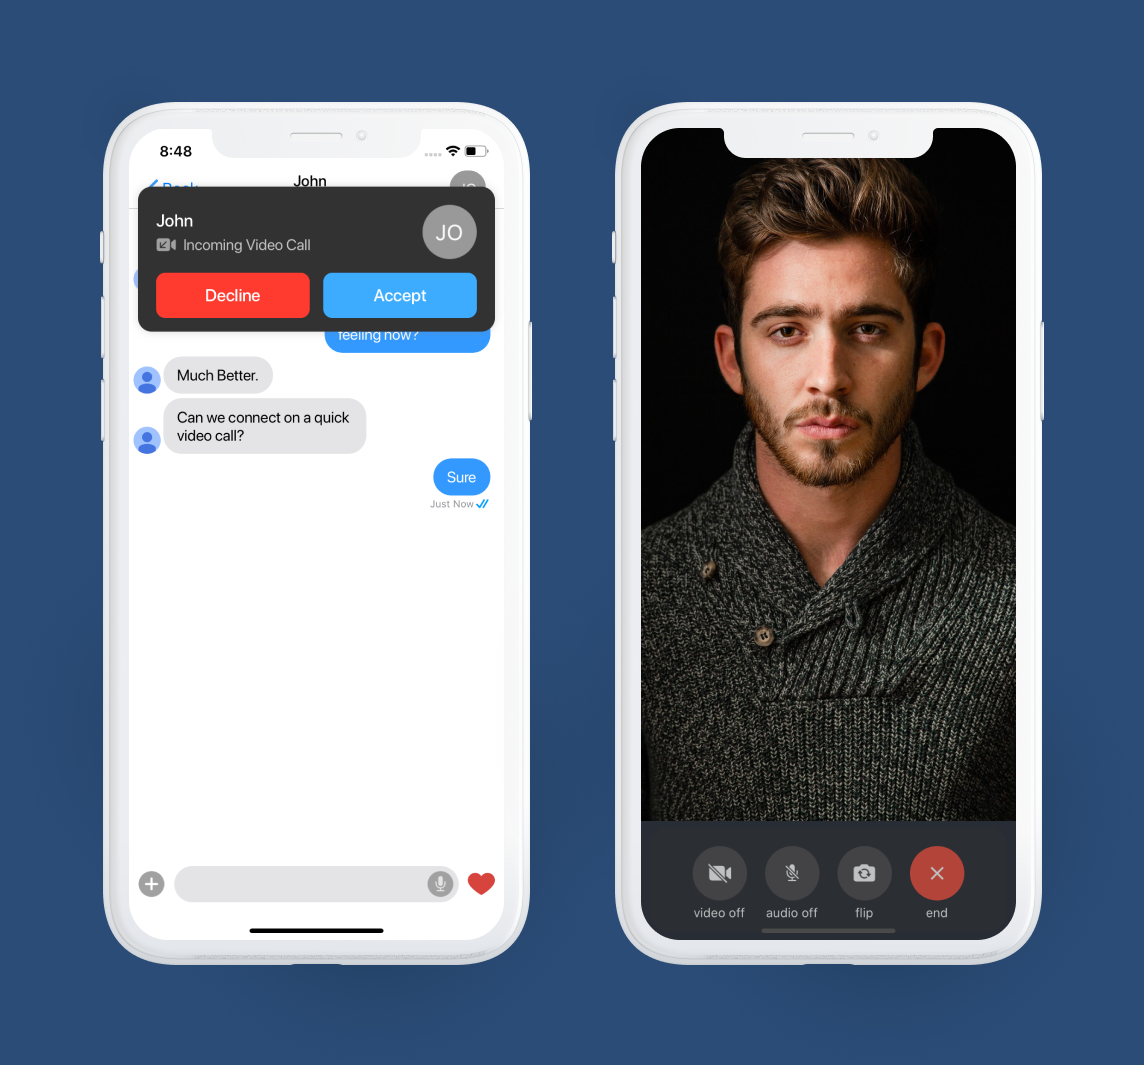
Did I mention Step 7 was interesting? This is one step ahead of that. But first, let me explain to you all the things that we’d have to do by ourselves if it wasn’t for CometChat -
Consider a scenario where User A places a call to User B →
There are 6 specific cases that we need to handle in a video or an audio chat app.
Notify User B when User A initiates the call
Start the call on User A’s side when User B accepts the call
End the call on User A’s side when User B declines the call
End the call on User B’s side when User A cancels the call before starting.
End the call on User A’s side when User B hangs up.
End the call on User B’s side when User A hangs up.
On top of handling these scenarios, we would also need to implement the UIs for these specific scenarios. For example -
The UI screen when someone initiates the call
The Incoming Call Screen
The Ongoing Call Screen
Sounds like a lot of work, right? CometChat does this for us with this one line of code -
CometChatCallManager().registerForCalls(application: self)
We would need to add this in our CometChat’s initialization function which we have placed in AppDelegate -
Conclusion
Woah, we implemented a clone of OhMD app! We used Firebase Auth for our registration and signup, Firebase Cloud Firestore as a back-end database, CometChat SDK to fetch conversations, users, signup and login, CometChat UI Kit to ease the UI development and CometChat friend API to map doctors and patients as friends in CometChat for proper visibility control.
You can find the entire source code of this app on GitHub.
I hope you learnt something new from this use case tutorial. As you might have observed, CometChat is like a toolkit. We can pick the required features and shape our app as we require. Sign up for a FREE CometChat trial to try building your own HIPAA compliant telehealth app, and see how easily it can be done!
If you found this tutorial useful, we also recommend our tutorials for...
About the author
Nabil Kazi currently leads Android and iOS Development teams at an IT service based company. He has five years of experience in native app development, and a track record of successfully deploying apps in one of the Big 4 consultancy firms, India's top Banks, BFSI and Manufacturing domains. He loves sharing his knowledge with the developer community.

Nabil Kazi
CometChat