

Building chat apps in React Native from scratch is an ambitious task that comes with a range of complex challenges, such as:
Setting up and managing real-time infrastructure for message exchanges
Implementing reliable message delivery and storage systems
Building presence tracking and typing indicators
Creating secure user authentication flows
Ensuring scalability for multiple users and heavy usage
Developing an intuitive and responsive chat interface
Managing cross-platform compatibility between iOS and Android
CometChat's React Native UI Kit simplifies this process by offering pre-built, customizable chat components that eliminate the heavy lifting, while still allowing developers the flexibility to align the chat experience with their unique app requirements.
To better understand how CometChat can accelerate your development process, here's a quick comparison of building a chat app using the traditional DIY approach versus leveraging CometChat:
| Feature/Component | DIY Approach | With CometChat |
|---|---|---|
Setup Time
| 3-4 weeks for basic features
| 2-3 days for full implementation
|
Backend Infrastructure
| Build and maintain servers, databases, and WebSocket connections. Handle platform-specific optimizations.
| Fully managed by CometChat. Scalable infrastructure.
|
Real-time Communication
| Implement WebSocket handling, connection management, and platform lifecycle events
| Built into SDK with automatic handling.
|
User Management
| Create user systems, presence tracking, and online status
| Pre-built user management system with cross-platform presence handling
|
Message Delivery
| Build queuing, retry logic, and delivery confirmation systems
| Automatic with guaranteed delivery and offline support
|
Media Handling
| Implement platform-specific upload, storage, and delivery systems
| Built-in media handling with CDN support and native pickers
|
Security
| Implement encryption, authentication, and access control
| Enterprise-grade security included
|
UI Components
| Build all chat interface components from scratch
| Pre-built, customizable UI components
|
Scaling
| Handle infrastructure scaling, load balancing, and performance optimization
| Automatically scales with your usage
|
Notifications
| Build a separate engine to manage notifications
| Out-of-the-box setup for push, email, and SMS notifications via dashboard, plus user preference controls
|
Moderation
| Build or integrate with third-party moderation tools
| AI-powered filters, conditional rules engine, and a centralized dashboard for admin control
|
Analytics
| Develop custom reports and metrics for user engagement and chat activity
| Built-in analytics with ready-made reports to track engagement, usage and chat activity
|
In this tutorial, we'll build a full-featured chat application that supports:
One-on-one and group messaging
Rich media sharing (images, files, links)
Message threads and reactions
User presence and typing indicators
Push notifications
Message moderation
Custom UI theming
By the end of this tutorial, you'll have a production-ready chat application that can be easily customized to match your brand and requirements, all powered by CometChat's robust backend infrastructure.
Prerequisites
Before starting, ensure you have:
Node.js (version 14 or higher)
React Native CLI (version 0.70.0 or higher)
JDK 11
npm or yarn package manager
Android Studio (for Android development)
Xcode 13+ (for iOS development)
iOS 12.0 or later (for iOS development)
CometChat account (free plan available)
Getting started
Step 1: Create a New React Native Project
Start by creating a fresh React Native project using the CLI. The command will set up a new React Native project with the latest stable version.
Step 2. Install Required Dependencies
Install the following packages with their specific versions to ensure compatibility:
For React Native 0.76 and above, also install:
iOS Setup
Step 3: Configure Project Settings
For optimal compatibility, disable the new React Native architecture for both platforms:
For iOS, update your ios/Podfile:
For Android, update android/gradle.properties:
Step 4: Add Platform Permissions
Add the necessary permissions,
For Android: Update AndroidManifest.xml with storage, vibration, and internet permissions
For iOS: Update Info.plist with required permissions
Android Permissions
Add the following permissions to android/app/src/main/AndroidManifest.xml inside the <manifest> tag:
Note: For Android development, ensure ANDROID_HOME environment variable is properly set or configure sdk.dir in local.properties
iOS Permissions
Add the following keys to ios/YourAppName/Info.plist inside the <dict> tag:
Note: Customize the permission description strings to match your app's specific use cases and privacy policy.
Step 5: Initialize CometChat
Create a configuration file to handle CometChat initialization. This setup includes:
Permission handling for Android
CometChat UI Kit initialization
Error handling and initialization status
Environment-specific configuration
Create a new file src/config/cometChat.js
Important security note: The Auth Key should only be used during development. For production, use Auth Tokens for secure user authentication.
Building the chat app interface
1. User login and authentication flow
Before diving into building the chat interface, we'll create a login component that authenticates users with CometChat using their unique User ID. This authentication system is fundamental as it establishes a secure connection between users and CometChat servers, managing user sessions and ensuring proper access to conversations.
We'll create a login form that:
Accepts a User ID input from the user
Authenticates the User ID against CometChat's backend
Handles loading states and error messages
Establishes a user session upon successful login
Step 1: Create a new authentication context to manage login state
Create src/context/AuthContext.js:
Step 2: Create Error Boundary Component
Create src/components/ErrorBoundary.js
Step 3: Create a Login screen
Create src/screens/LoginScreen.js:
2. Building the chat interface
Update App.js:
Adding advanced functionalities on top of the existing features
1. Setting up notifications
Now that your chat functionality is up and running, it's time to enable notifications so users never miss a message. CometChat’s Notifications module allows you to set up and manage notifications across multiple providers directly from the dashboard, ensuring centralized control and effortless configuration. You can easily integrate push notifications with APNs and FCM, email notifications with SendGrid, and SMS alerts with Twilio, or use webhooks to connect with any provider of your choice.
You can also enable notification preferences for your users, allowing them to customize when and how they receive notifications. Additionally, our customizable templates let you tailor notifications to your app’s tone and branding.
2. Setting up advanced moderation
Next, we’ll explore CometChat’s powerful moderation capabilities, which you can enable using the CometChat SDK. These features are designed to help maintain a safe, respectful environment for users and allow you to moderate content in real time.
Front-end moderation
User reporting
Empower your users to report inappropriate behavior or content directly from the chat interface.
User blocking
Allow users to block others, preventing unwanted interactions.
Message flagging
Enables users to flag specific messages for review by administrators.
Moderation queue:
Use our centralized moderation dashboard to give app admins an organized view of flagged messages, reported users, and blocked content. From this dashboard, admins can take real-time action on flagged content, issue user bans or warnings, and escalate issues for higher-level review, all in one place.
Proactive content moderation:
Use our advanced AI filters to prevent harmful content from entering your chat. These filters automatically screen every message exchanged in your app for violations defined by you and take action based on the moderation rules you’ve set up with our rules engine.
CometChat’s rules engine lets you create custom rules to address common moderation scenarios. You can define which filters to use for identifying violations and specify how to handle them, such as blocking a user or removing them from a group. This helps you keep your app free from:
Spam
Block unwanted or malicious content.
Harassment
Automatically filter harmful messages or behavior.
Image and Video Moderation
Analyze and filter media content to ensure it follows guidelines
3. Using Webhooks to extend your chat app's functionality
Leverage webhooks to trigger actions based on key events like message exchanges, user interactions, group changes, and call activities. You can use them to automate tasks, integrate with external services, and optimize the chat experience in your app. You can configure these webhooks directly from the CometChat dashboard.
Here’s a list of available webhooks:
| Category | Webhook Event |
|---|---|
Message
| Message Sent, Edited, Deleted, Reacted, Mentioned, Delivered, Read
|
User
| User Blocked, Unblocked, Connection Status Changed
|
Group
| Group Created, Member Added, Member Left, Group Owner Changed, Member Kicked
|
Calling
| Call Started, Call Ended, Call Initiated, Participant Joined, Participant Left, Call Recording Generated
|
Customizing Your Chat Interface
One of the key advantages of using CometChat's UI Kit is the ability to easily customize the appearance and behavior of your chat interface. In this section, we'll explore how to customize your chat app at both the theme level and component level.
Theme Level Customization
CometChat's theme system allows you to make app-wide changes to colors, typography, and other visual elements. The theme consists of two main components:
1. Palette: Controls the app's color scheme
The palette defines colors for various elements, with built-in support for light and dark modes to ensure seamless theme switching. Key color categories include:
Primary Colors: Represent your main brand identity.
Secondary Colors: Complement and support primary colors.
Accent Colors: Highlight important elements for emphasis.
Background Colors: Define the appearance of the app's background.
Error Colors: Indicate error states and messages.
Each color category can be configured with separate values for light and dark modes.
2. Typography: Defines text styles and appearances
Typography allows you to customize the text across your app for different use cases. The key text styles include:
Heading: For main headings and prominent titles.
Name: Styled for usernames and contact names.
Title (1 & 2): Applied to section titles and headers.
Subtitle (1 & 2): For supporting text under titles.
Text (1 & 2): General text styles for content and messages.
Caption (1 & 2): For smaller, supplementary text elements.
All these customizations can be applied through the theme configuration, ensuring consistent styling across your entire chat application.
Setting Up Custom Theme
Create a new file src/config/theme.js to manage your theme customizations:
Applying the custom theme
Update your App.js to initialize and apply the custom theme:
Component customization
Conversations component customisation
The Conversations component displays all conversations related to the currently logged-in user. To ensure the component aligns with your app's design and branding, you can easily customize its appearance by adjusting the properties exposed by the ConversationsStyle class. Below, you'll find a table outlining all the properties you can modify to tailor the component to your specific needs.
| Category | Customizable Elements | Description |
|---|---|---|
Layout & Appearance
| List Item View
| Height, width, background colors, hover states
|
Layout & Appearance
| Avatar Display
| Shape, size, border radius, default icons
|
Layout & Appearance
| Status Indicators
| Size, color, position, visibility
|
Content Display
| Conversation Title
| Font style, size, color, formatting
|
Content Display
| Last Message Preview
| Length, style, condensed view options
|
Content Display
| Timestamps
| Format, position, localization
|
Interactive Elements
| Search Bar
| Visibility, placeholder text, icon customization
|
Interactive Elements
| Selection Mode
| Single/multi select, selection indicators
|
Interactive Elements
| Empty States
| Custom messages, actions, layouts
|
For more advanced customization, you can define custom views within the Conversations component. This allows you to fully control and tailor each element of the interface, such as layouts, views, and UI elements, ensuring that the component perfectly matches your app's overall aesthetics and functionality. .
Messages component customization
The Messages component is a central feature of our chat interface, responsible for rendering the area where messages are exchanged between users and groups. It plays a key role in managing the real-time flow of messages within the app. Below, you'll find a table outlining all the properties you can modify to tailor the messages component to your specific needs
| Category | Customizable Elements | Description |
|---|---|---|
Message Bubbles
| Layout
| Size, shape, padding, margins
|
Message Bubbles
| Styling
| Colors, borders, shadows
|
Message Bubbles
| Alignment
| Left/right positioning, spacing
|
Message Types
| Text Messages
| Font styles, sizes, colors
|
Message Types
| Media Messages
| Preview size, player controls
|
Message Types
| Link Previews
| Size, layout, information display
|
Interactive Features
| Reactions
| Position, size, layout
|
Interactive Features
| Thread Replies
| Thread view, indicators
|
Interactive Features
| Message Actions
| Custom actions, menus
|
Metadata Display
| Timestamps
| Format, position
|
Metadata Display
| Read Receipts
| Style, position, indicators
|
Metadata Display
| Typing Indicators
| Animation, position
|
Testing Your Chat App
Before you deploy your project to production, it's important to properly structure, test, and verify that everything works as expected. In this section, we'll walk you through how to run the project locally, test key features, and ensure that everything is functioning properly before moving to deployment.
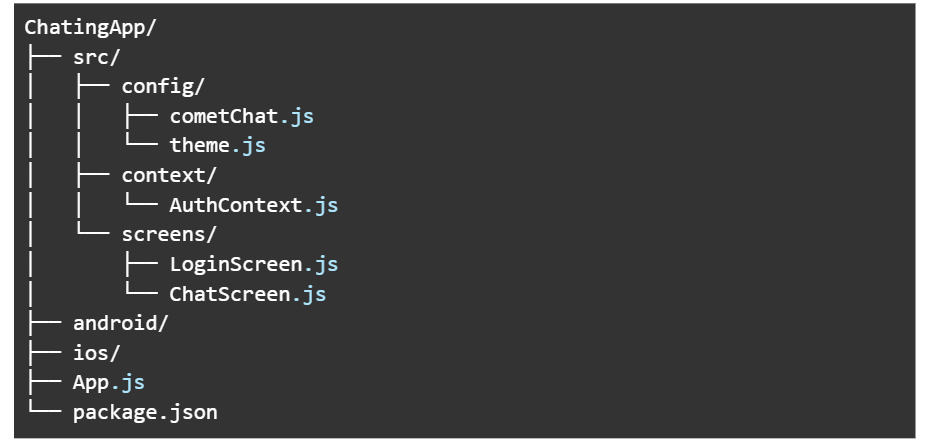
Your final project structure should look like this
Testing checklist
1. Configuration Check
Verify CometChat credentials in cometChat.js
Ensure all required permissions are in place for both platforms
2. Functional Testing
Test the following flows to ensure your chat app is working correctly:
Authentication Flow
Try logging in with valid test user credentials
Verify error handling with invalid credentials
Check if login session persists after app restart
Chat Functionality
Login with two different test users on different devices
Start a conversation between these users
Verify real-time message delivery
Test media sharing capabilities
Check user online/offline status updates
UI/Theme Verification
Verify your custom theme is applied correctly
Test on both iOS and Android devices
Check all interactive elements (buttons, inputs)
Deployment Preparation
Android Release
Step 1: Generate Release Keystore
Step 2: Configure Gradle Properties
Create or update android/gradle.properties
Step 3: Update build.gradle
Edit android/app/build.gradle :
Step 4: Create Final Release Build
The release APK will be in android/app/build/outputs/apk/release/
iOS Release
Xcode Configuration
Open Xcode
Select your project
Set Build Configuration to Release
Update version and build numbers
Configure signing certificates
Archive and Upload
Select Generic iOS Device as the build target
Choose Product > Archive
In Archives window, click "Distribute App"
Follow App Store distribution workflow
Final Deployment Checklist
Verify production CometChat credentials
Remove any test API keys
Configure proper error reporting

Haris Kumar
Lead Content Strategist , CometChat