Version: v6

Building a One-to-One/Group Chat Experience

The One-to-One Chat feature provides a streamlined direct messaging interface, making it ideal for support chats, dating apps, and private messaging platforms. This setup eliminates distractions by focusing solely on a dedicated chat window.

Edit Next.js - One-to-One/Group Chat Experience

Tip: You can fork the sandbox, insert your CometChat credentials (App ID, Region, Auth Key.) in the code, and immediately preview how the UI and messages respond in real time.


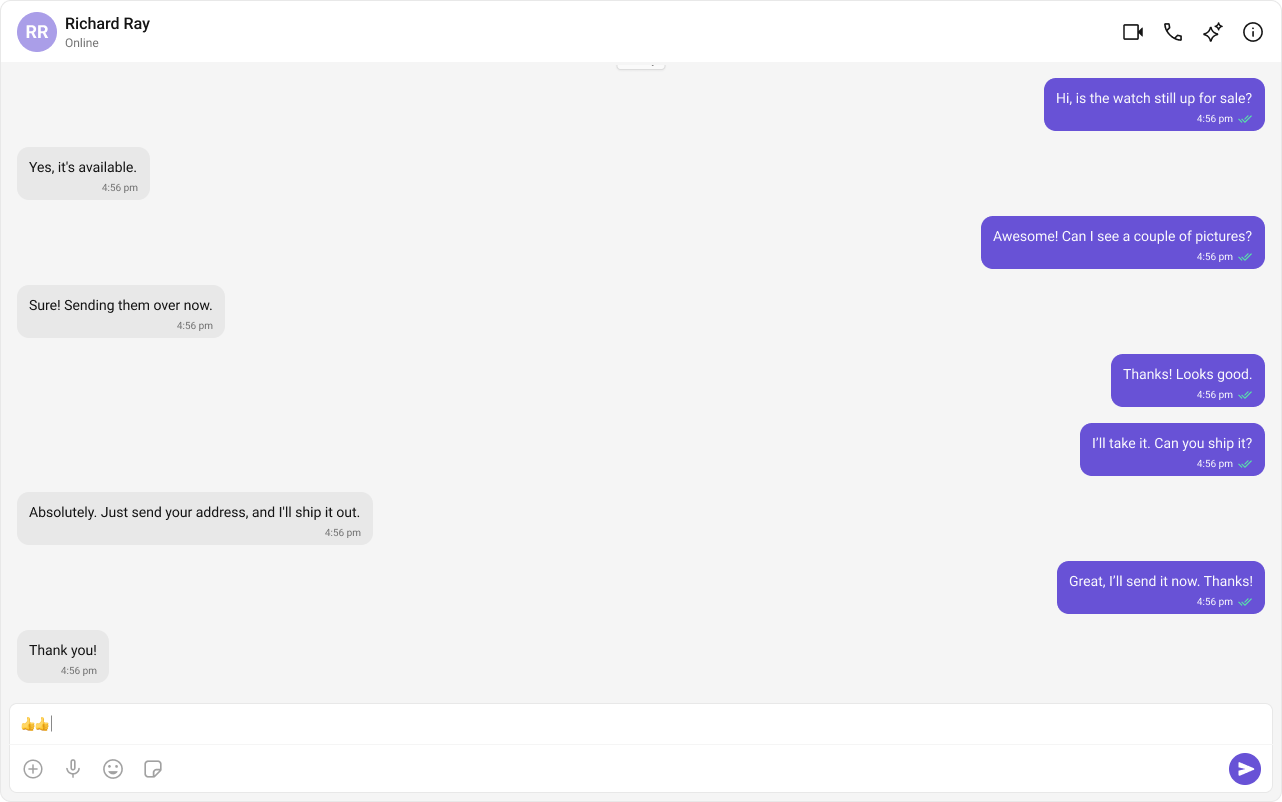
User Interface Preview
Image

Key Components

  1. Chat Header – Displays recipient details and optional call/video call buttons.
  2. Message View – Shows real-time chat history.
  3. Message Input Box – Enables users to send messages, media, and reactions.

Step-by-Step Guide

Step 1: Implement the Chat Header

  • Display profile picture, name, and online status.
  • Add voice and video call buttons (optional).
<CometChatMessageHeader user={selectedUser} group={selectedGroup} />

Step 2: Build the Message View

  • Load chat history and real-time messages.
  • Ensure smooth scrolling and timestamp visibility.
<CometChatMessageList user={selectedUser} group={selectedGroup} />

Step 3: Add the Message Composer

  • Include a text input field.
  • Support media uploads, file attachments, emojis, and reactions.
<CometChatMessageComposer user={selectedUser} group={selectedGroup} />

Implementation

Now we will create the CometChatNoSSR.tsx & CometChatNoSSR.css files. Here, we will initialize the CometChat UI Kit, log in a user, and build the messaging experience using CometChatMessageHeader, CometChatMessageList, and CometChatMessageComposer components.

src/
│── CometChatNoSSR/
│ ├── CometChatNoSSR.tsx
│ ├── CometChatNoSSR.css
CometChatNoSSR.tsx
import React, { useEffect, useState } from "react";
import { CometChatMessageComposer, CometChatMessageHeader, CometChatMessageList, CometChatUIKit, UIKitSettingsBuilder } from "@cometchat/chat-uikit-react";
import { CometChat } from "@cometchat/chat-sdk-javascript";
import "./CometChatNoSSR.css";

const COMETCHAT_CONSTANTS = {
APP_ID: "",
REGION: "",
AUTH_KEY: "",
};

const CometChatNoSSR: React.FC = () => {
const [user, setUser] = useState<CometChat.User | undefined>(undefined);
const [selectedUser, setSelectedUser] = useState<CometChat.User | undefined>(undefined);
// eslint-disable-next-line @typescript-eslint/no-unused-vars
const [selectedGroup, setSelectedGroup] = useState<CometChat.Group | undefined>(undefined);

useEffect(() => {
const UIKitSettings = new UIKitSettingsBuilder()
.setAppId(COMETCHAT_CONSTANTS.APP_ID)
.setRegion(COMETCHAT_CONSTANTS.REGION)
.setAuthKey(COMETCHAT_CONSTANTS.AUTH_KEY)
.subscribePresenceForAllUsers()
.build();

CometChatUIKit.init(UIKitSettings)
?.then(() => {
console.log("Initialization completed successfully");
CometChatUIKit.getLoggedinUser().then((loggedInUser) => {
if (!loggedInUser) {
CometChatUIKit.login("superhero1")
.then((user) => {
console.log("Login Successful", { user });
setUser(user);
})
.catch((error) => console.error("Login failed", error));
} else {
console.log("Already logged-in", { loggedInUser });
setUser(loggedInUser);
}
});
})
.catch((error) => console.error("Initialization failed", error));
}, []);

useEffect(() => {
if (user) {
// Fetch user or group from CometChat SDK whose chat you want to load.

/** Fetching User */
const UID = "cometchat-uid-1";
CometChat.getUser(UID).then(
user => {
setSelectedUser(user);
}, error => {
console.log("User fetching failed with error:", error);
}
);

/** Fetching Group */
// const GUID = "GUID"
// CometChat.getGroup(GUID).then(
// group => {
// setSelectedGroup(group);
// }, error => {
// console.log("User fetching failed with error:", error);
// }
// );
}
}, [user]);

return user ? (
<>
{selectedUser || selectedGroup ? (
<div className="messages-wrapper">
<CometChatMessageHeader user={selectedUser} group={selectedGroup} />
<CometChatMessageList user={selectedUser} group={selectedGroup} />
<CometChatMessageComposer user={selectedUser} group={selectedGroup} />
</div>
) : (
<div className="empty-conversation">Select Conversation to start</div>
)}
</>
) : undefined;
};

export default CometChatNoSSR;

In the code snippet above, ensure you select either a user or a group based on your chat requirement. You can also determine this dynamically depending on the conversation type.

Fetching a User (One-on-One Chat)

const UID = "cometchat-uid-1";
CometChat.getUser(UID).then(
user => {
setSelectedUser(user);
}, error => {
console.log("User fetching failed with error:", error);
}
);

Fetching a Group (Group Chat)

const GUID = "GUID"
CometChat.getGroup(GUID).then(
group => {
setSelectedGroup(group);
}, error => {
console.log("User fetching failed with error:", error);
}
);

Step 4: Disabling SSR for CometChatNoSSR.tsx in Next.js

In this update, we will disable Server-Side Rendering (SSR) for CometChatNoSSR.tsx while keeping the rest of the application’s SSR functionality intact. This ensures that the CometChat UI Kit components load only on the client-side, preventing SSR-related issues.

Disabling SSR in index.tsx

Modify your index.tsx file to dynamically import the CometChatNoSSR.tsx component with { ssr: false }.

index.tsx
import { Inter } from "next/font/google";
import dynamic from "next/dynamic";

import '@cometchat/chat-uikit-react/css-variables.css';

const inter = Inter({ subsets: ["latin"] });

// Dynamically import CometChat component with SSR disabled
const CometChatComponent = dynamic(() => import("../CometChatNoSSR/CometChatNoSSR"), {
ssr: false,
});

export default function Home() {
return <CometChatComponent />;
}

Why disable SSR?

  • The CometChat UI Kit depends on browser APIs (window, document, WebSockets).
  • Next.js pre-renders components on the server, which can cause errors with browser-specific features.
  • By setting { ssr: false }, we ensure that CometChatNoSSR.tsx only loads on the client.

Step 5: Update Global CSS

Next, add the following styles to global.css to ensure CometChat UI Kit is properly styled.

global.css
:root {
--background: #ffffff;
--foreground: #171717;
}

@media (prefers-color-scheme: dark) {
:root {
--background: #0a0a0a;
--foreground: #ededed;
}
}

/** Give your App a height of `100%`. Keep other CSS properties in the below selector as it is. */
.root {
height: 100%;
}

#__next {
height: 100%;
}

html,
body {
height: 100%;
}

html,
body {
max-width: 100vw;
overflow-x: hidden;
}

body {
color: var(--foreground);
background: var(--background);
font-family: Arial, Helvetica, sans-serif;
-webkit-font-smoothing: antialiased;
-moz-osx-font-smoothing: grayscale;
}

* {
box-sizing: border-box;
padding: 0;
margin: 0;
}

a {
color: inherit;
text-decoration: none;
}

@media (prefers-color-scheme: dark) {
html {
color-scheme: dark;
}
}

Step 6: Run the project

npm run dev

Next Steps

Enhance the User Experience