Get your Application Keys
Signup for CometChat and then:
- Create a new app
- Head over to the API Keys section and note the Auth Key, App ID & Region
Minimum Requirement
- Xcode 12 (or Higher)
- iOS 11 or higher
Add the CometChat Dependency
CocoaPods
We recommend using CocoaPods, as they are the most advanced way of managing iOS project dependencies. Open a terminal window, move to your project directory, and then create a Podfile by running the following command.
- CometChatPro SDK supports installation through Cocoapods only. Currently, we are supporting Xcode 11.4 and higher.
- CometChatPro SDK includes video calling components. We suggest you run on physical devices to avoid errors.
platform :ios, '11.0'
use_frameworks!

target 'MyApp' do
  pod 'CometChatPro', '2.4.2'
end
2.4.1+ onwards, Voice & Video Calling functionality has been moved to a separate framework. In case you do not plan to use the calling feature, please add the Calling framework pod 'CometChatCalls', '2.1.1' in your app Podfile.
CometChatPro framework through CocoaPods.
Always get the latest version of CometChatPro by command
$ pod update CometChatPro
Request Authorization
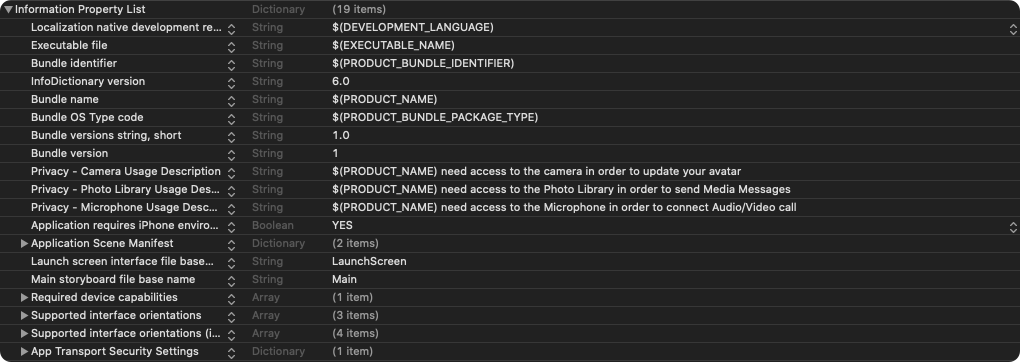
Prepare your app for this requirement by providing justification strings. The justification string is a localizable message that you add to your app’s Info.plist file to tell the user why your app needs access to the user’s photo library, Camera, Microphone. Then, App prompts the user to grant permission for access, the alert displays the justification string you provided, in the language of the locale selected on the user’s device. You can do this as follows:
<key>NSAppTransportSecurity</key>
  <dict>
	  <key>NSAllowsArbitraryLoads</key>
	  <true />
  </dict>
<key>NSCameraUsageDescription</key>
	<string>$(PRODUCT_NAME) need access to the camera in order to update your avatar</string>
<key>NSPhotoLibraryUsageDescription</key>
	<string>$(PRODUCT_NAME) need access to the Photo Library in order to send Media Messages</string>
<key>NSMicrophoneUsageDescription</key>
	<string>$(PRODUCT_NAME) need access to the Microphone in order to connect Audio/Video call </string>
Setup Bitcode
You can set the Enable Bitcode setting to YES present in build settings in your XCode project.
If you are using CometChat Pro SDK having the version less than 2.0.8, then you need to set Enable Bitcode to NO
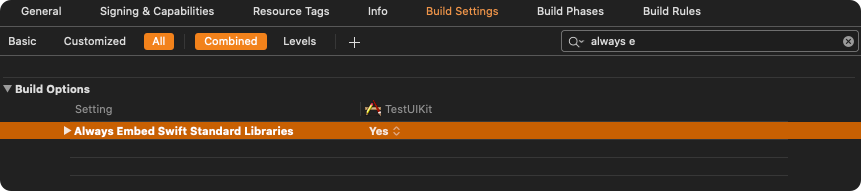
Swift Standard Libraries
CometChatProframework build on Swift, you have to ensure the required libraries are embedded. This can be done by setting the “Always Embed Swift Standard Libraries” checkbox in your target’s build settings to “Yes”:
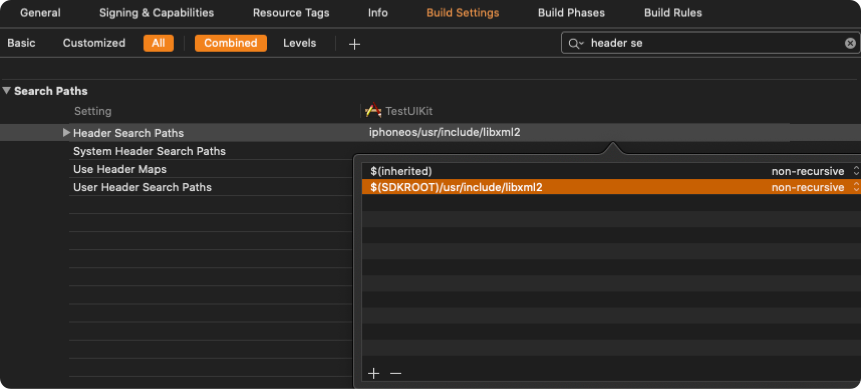
Set the Header Search Paths to $SDKROOT/usr/include/libxml2.
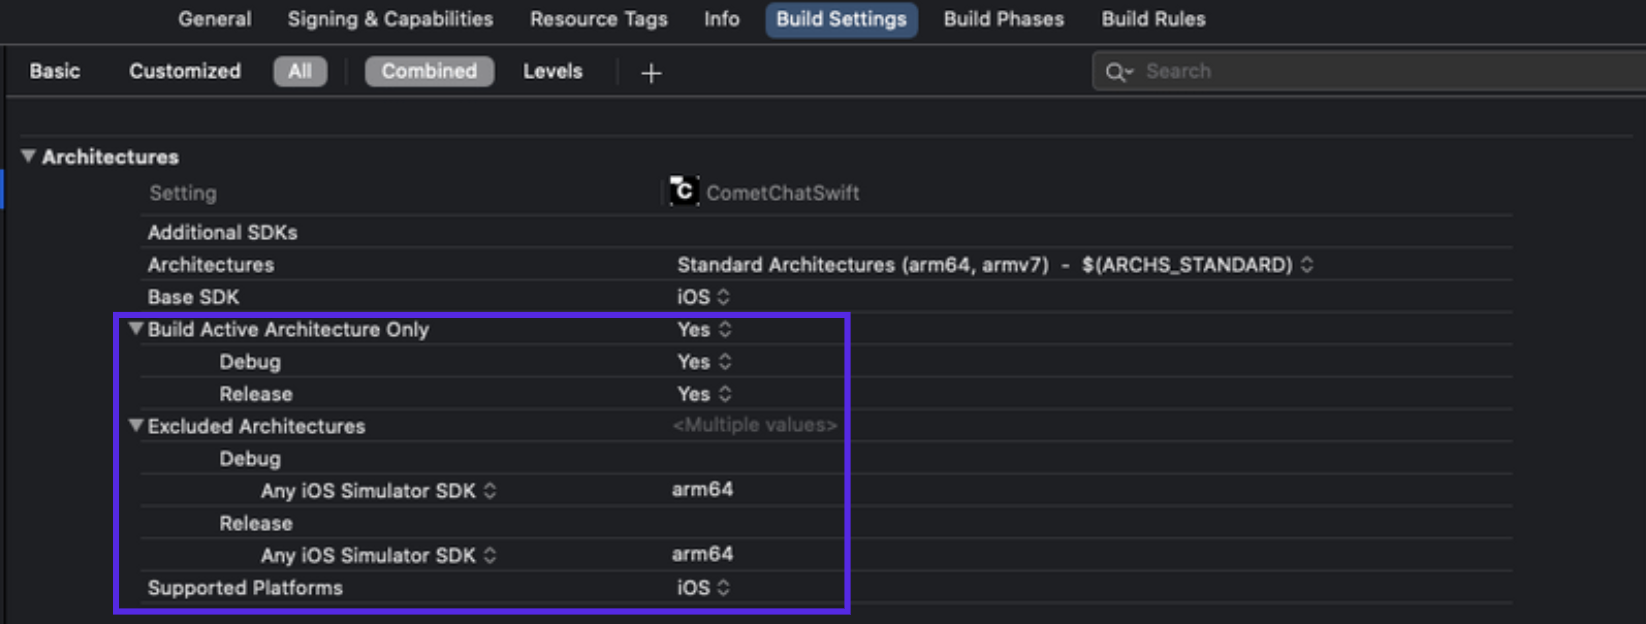
Excluded Architecture
For Xcode 12 and above, we need to add arm64 in the excluded architecture of build settings as Apple supports only arm architecture for simulators and actual devices. No support provided for X86_64 and i386 architectures.
Setting for build for active architecture
In Build Settings, enable active architecture to Yes
Initialize CometChat
The init() method initializes the settings required for CometChat. We suggest you call the method on app startup preferably in the didFinishLaunchingWithOptions: method of the AppDelegate class.
import CometChatPro

class AppDelegate: UIResponder, UIApplicationDelegate{
{
   var window: UIWindow?
   let appId: String = "ENTER APP ID"
   let region: String = "ENTER REGION CODE"

func application(_ application: UIApplication, didFinishLaunchingWithOptions launchOptions: [UIApplication.LaunchOptionsKey: Any]?) -> Bool {

let mySettings = AppSettings.AppSettingsBuilder().subscribePresenceForAllUsers().setRegion(region: region).build()

  CometChat.init(appId: appId ,appSettings: mySettings,onSuccess: { (isSuccess) in
            if (isSuccess) {
                print("CometChat Pro SDK intialise successfully.")
            }
        }) { (error) in
                print("CometChat Pro SDK failed intialise with error: \(error.errorDescription)")
        }
        return true
    }
}
#import <CometChatPro/CometChatPro-Swift.h>

@interface AppDelegate ()

@end

@implementation AppDelegate


- (BOOL)application:(UIApplication *)application didFinishLaunchingWithOptions:(NSDictionary *)launchOptions {

  NSString *region = @"REGION";
  NSString *appID = @"YOUR_APP_ID";

    AppSettingsBuilder *appSettingBuilder = [[AppSettingsBuilder alloc]init];
    AppSettings *appSettings = [[[appSettingBuilder subscribePresenceForAllUsers]setRegionWithRegion:region]build];

    [[CometChat alloc]initWithAppId: appID appSettings:appSettings onSuccess:^(BOOL isSuccess) {
        NSLog(isSuccess ? @"CometChat Initialize Success:-YES" : @"CometChat Initialize Success:-NO");
    } onError:^(CometChatException * error) {
        NSLog(@"Error %@",[error errorDescription]);
    }];
    return YES;
}
appId with your CometChat App ID in the above code.
Publishing to App Store
To publish your App on App Store please follow this guide