MessageTemplate defines and customizes both the structure and the behavior of the MessageBubble. It acts as a schema for creating MessageBubble components, allowing you to manage the appearance and interactions of message bubbles within your application.
When to Use This
- You need to customize the header, content, footer, bottom, or status info view of a message bubble
- You want to replace the default bubble layout with a completely custom view
- You need to add or modify the long-press options on a message bubble
- You want to create a new template for a custom message type (e.g., a contact card)
- You need to change how a specific message type (text, image, etc.) renders in the MessageList
Prerequisites
- CometChat Android UI Kit dependency added to your project
CometChatUIKit.init()called and completed- A logged-in CometChat user
- Familiarity with the MessageList component
- Familiarity with MessageBubble styling
Quick Start
- Get the list of existing message templates from the data source:
- Kotlin
- Java
What this does: Retrieves all registered message templates from the UI Kit data source, giving you the full list of templates to modify or extend.
- Find the template for the message type you want to customize (e.g., text messages):
- Kotlin
- Java
What this does: Iterates through the templates list and matches the template whosetypeequalsUIKitConstants.MessageType.TEXT, so you can customize only text message bubbles.
- Customize a view on the matched template (e.g., set a custom content view):
- Kotlin
- Java
What this does: Overrides the content view of the matched template by providing aMessagesViewHolderListenerthat inflates a custom layout increateView()and binds message data to it inbindView().
- Apply the modified templates to the
MessageListcomponent:
- Kotlin
- Java
What this does: Passes the modified templates list to the MessageList component so it uses your customized templates when rendering message bubbles.
Core Concepts
MessageBubble Structure
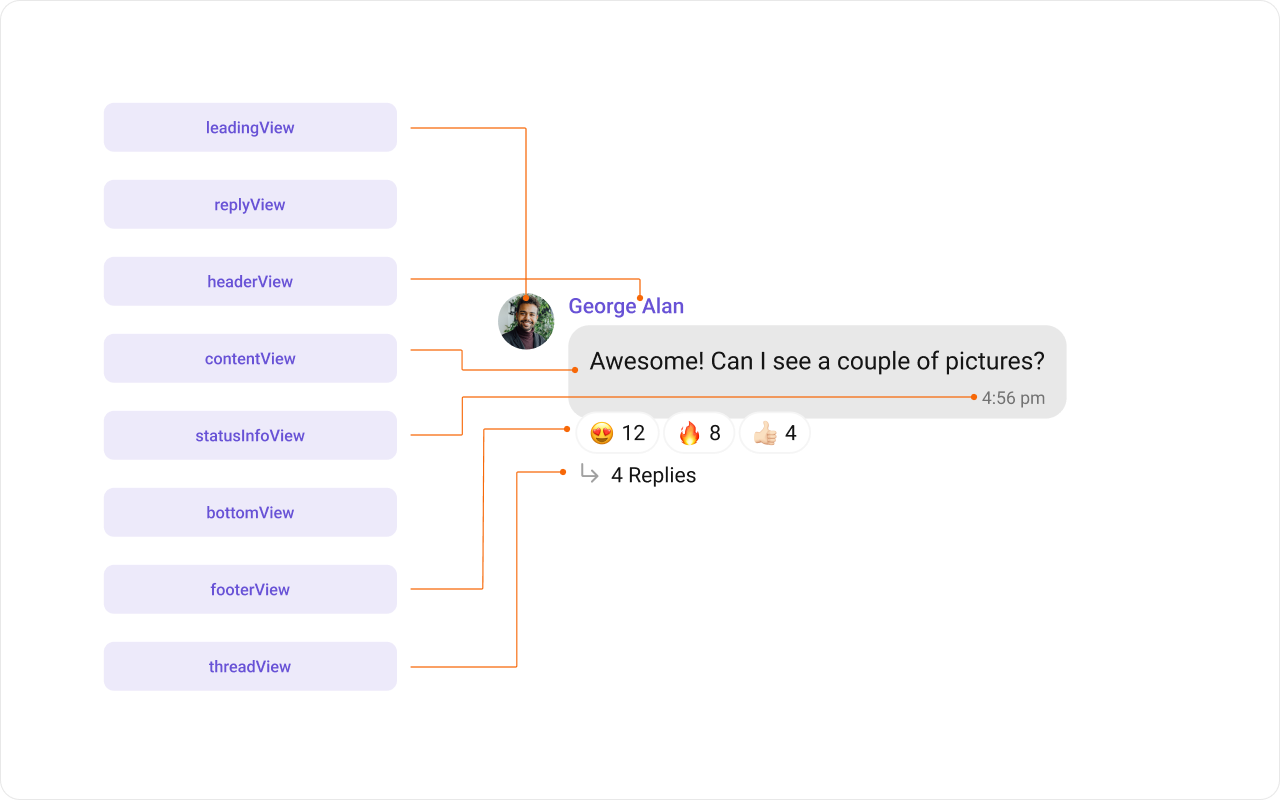
MessageBubble structure is broken down into these views:
-
Leading view: Displays the sender’s avatar. It appears on the left of the
MessageBubblefor messages from others and on the right for messages from the current user. - Header view: Displays the sender’s name. This is useful in group chats where multiple users are sending messages.
-
Content view: The core of the
MessageBubblewhere the message content (text, images, videos, etc.) is displayed. -
Bottom view: Extends the
MessageBubblewith additional elements, such as link previews or a “load more” button for long messages. It is placed beneath the Content view. -
Footer view: Displays the timestamp of the message and its delivery or read status. It is located at the bottom of the
MessageBubble.
Template Properties
MessageTemplate provides methods that allow you to alter various properties of the MessageBubble, including the type and category of a message, and the appearance and behavior of the header, content, and footer sections.
Type: Use setType() to set the type of CometChatMessage. This maps your MessageTemplate to the corresponding CometChatMessage.
What this does: Sets the message type on the template so the UI Kit knows which incoming messages this template applies to.Category: Use
setCategory() to set the category of a MessageTemplate. This creates a MessageTemplate with the specified category and links it with a CometChatMessage of the same category. Refer to the guide on Message Categories for a deeper understanding.
What this does: Sets the message category on the template, linking it to messages of the same category (e.g., CUSTOM).
Implementation
Header View
What you are changing: The header area of the message bubble, which displays above the content view.- Where:
MessagesViewHolderListenerpassed totemplate.setHeaderView() - Applies to: Any message type matched by the template (e.g.,
UIKitConstants.MessageType.TEXT) - Default behavior: Displays the sender’s name
- Override: Pass a
MessagesViewHolderListenertosetHeaderView()that inflates a custom layout increateView()and binds data inbindView()

message_template_header_view.xml
What this does: Defines a custom header layout with a single TextView that shows the sender’s name and a status indicator.
Code:
- Kotlin
- Java
What this does: ThecreateView()method inflatesmessage_template_header_view.xmlas the header view for every message. ThebindView()method sets the sender’s name and a status emoji on theTextView, and is called every time a ViewHolder for that message type is bound.
- Verify: Each text message bubble displays a custom header showing the sender’s name followed by ” • 🗓️ In meeting” in the primary color, replacing the default sender name header.
Content View
What you are changing: The main content area of the message bubble where the message body is displayed.- Where:
MessagesViewHolderListenerpassed totemplate.setContentView() - Applies to: Any message type matched by the template (e.g.,
UIKitConstants.MessageType.IMAGE) - Default behavior: Displays the Text Bubble, Image Bubble, File Bubble, Audio Bubble, or Video Bubble, depending on the message type
- Override: Pass a
MessagesViewHolderListenertosetContentView()that inflates a custom layout increateView()and binds data inbindView()
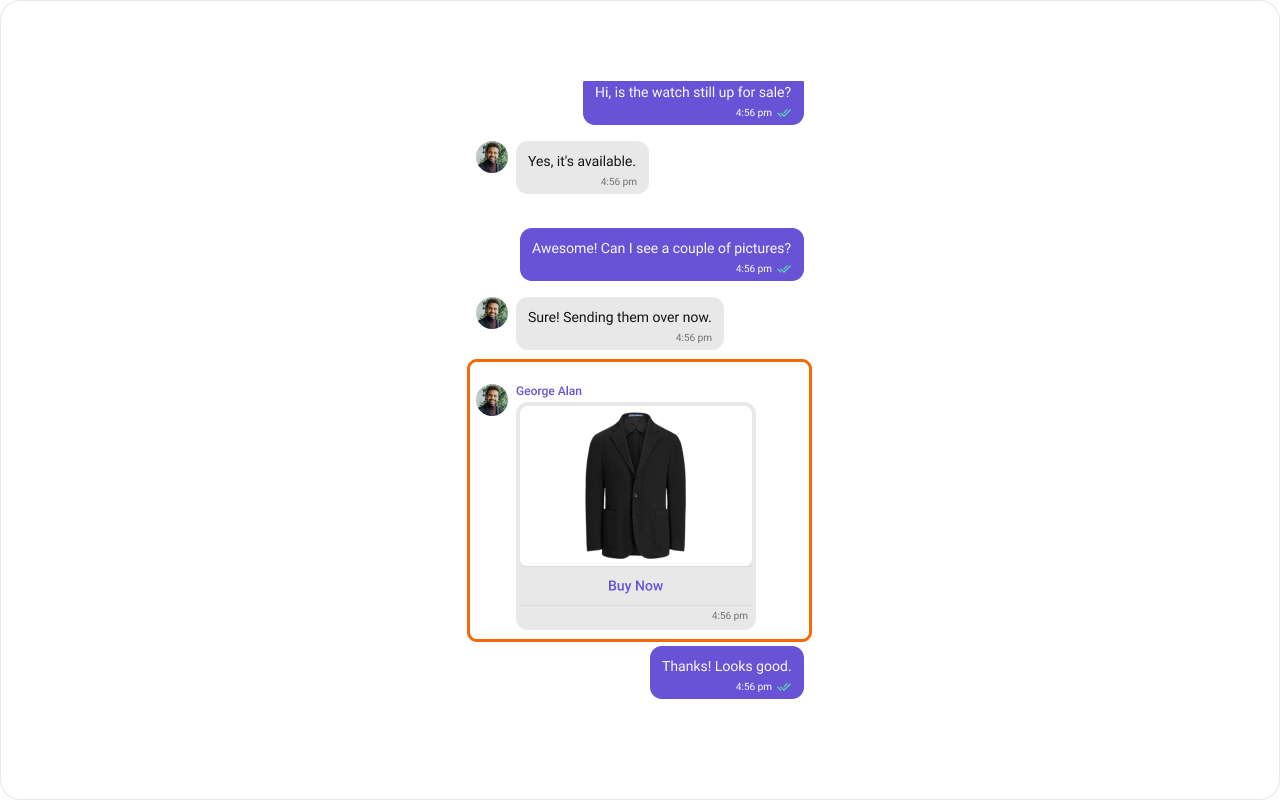
image_bubble_content_view.xml
What this does: Defines a custom content layout with aCode:CometChatImageBubble, a “Buy Now” label below it, and a hiddenCometChatDeleteBubblethat appears when the message is deleted.
- Kotlin
- Java
What this does: ThecreateView()method inflatesimage_bubble_content_view.xmlas the content view for every image message. ThebindView()method handles displaying the image withCometChatImageBubblewhen the message is not deleted, and showing aCometChatDeleteBubblewhen the message has been deleted.
- Verify: Image message bubbles display a
CometChatImageBubblewith a “Buy Now” label below it. If the message is deleted, the image is hidden and a delete bubble appears instead.
Status Info View
What you are changing: The status info area inside the message bubble, which displays delivery/read status indicators.- Where:
MessagesViewHolderListenerpassed totemplate.setStatusInfoView()(and optionallytemplate.setFooterView()for relocated status content) - Applies to: Any message type matched by the template (e.g.,
UIKitConstants.MessageType.TEXT) - Default behavior: Displays the message receipt and timestamp inside the bubble
- Override: Pass a
MessagesViewHolderListenertosetStatusInfoView()that returns a minimal empty view, and move the status content to the footer view usingsetFooterView()
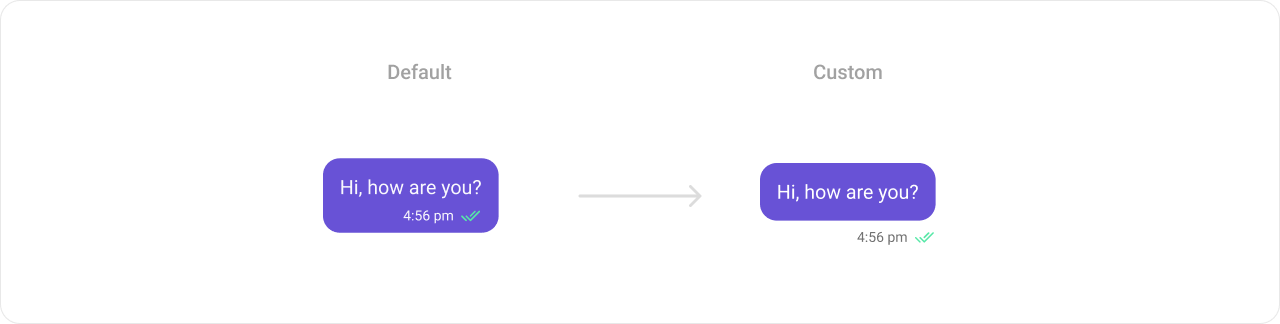
status_info_layout.xml
What this does: Defines a custom status info layout with a timeCode:TextViewand aCometChatMessageReceiptview arranged horizontally, aligned to the end of the bubble.
- Kotlin
- Java
What this does: ThesetStatusInfoView()replaces the default in-bubble status info with a minimal 1dp×12dp empty view. ThesetFooterView()inflatesstatus_info_layout.xmlas the footer, displaying the timestamp and message receipt outside the bubble. If the alignment isRIGHT(sent messages), the receipt icon is visible; ifLEFT(received messages), the receipt icon is hidden.
- Verify: Text message bubbles show the timestamp and delivery receipt below the bubble (in the footer area) instead of inside the bubble. Sent messages display both the time and receipt icon; received messages display only the time.
Bottom View
What you are changing: The bottom area of the message bubble, placed beneath the content view.- Where:
MessagesViewHolderListenerpassed totemplate.setBottomView() - Applies to: Any message type matched by the template (e.g.,
UIKitConstants.MessageType.TEXT) - Default behavior: Displays buttons such as link previews or a “load more” button for long messages
- Override: Pass a
MessagesViewHolderListenertosetBottomView()that inflates a custom layout increateView()and binds data inbindView()

message_template_bottom_view.xml
What this does: Defines a custom bottom view layout with an error icon and a red warning text, used to display a policy warning below the message content.Code:
- Kotlin
- Java
What this does: ThecreateView()method inflatesmessage_template_bottom_view.xmlas the bottom view for every message. ThebindView()method hides the bottom view by default and shows it only if the message has metadata and the message receipt equalsReceipt.ERROR.
- Verify: The bottom view is hidden by default. If a message has an error receipt (
Receipt.ERROR) and non-null metadata, a red warning banner with an error icon and text appears below the message content.
Footer View
What you are changing: The footer area of the message bubble, located at the bottom of the bubble.- Where:
MessagesViewHolderListenerpassed totemplate.setFooterView() - Applies to: Any message type matched by the template (e.g.,
UIKitConstants.MessageType.TEXT) - Default behavior: Displays the receipt and timestamp
- Override: Pass a
MessagesViewHolderListenertosetFooterView()that inflates a custom layout increateView()and binds data inbindView()

What this does: Defines a custom footer layout with a thin separator line and a CometChatMessageReaction view that displays message reactions.
Code:
- Kotlin
- Java
What this does: ThecreateView()method inflates a custom footer layout with aCometChatMessageReactionview. ThebindView()method sets the background color based on alignment (primary color for sent messages, neutral color for received messages), applies theCometChatReactionStyle, and binds up to 4 reactions to the message.
- Verify: Each message bubble displays a reactions bar in the footer area with a separator line above it. Sent message footers use the primary color background; received message footers use the neutral color background. Up to 4 reactions are displayed per message.
Bubble View
What you are changing: The entire message bubble, replacing the default combination of header, content, and footer views with a fully custom layout.- Where:
MessagesViewHolderListenerpassed totemplate.setBubbleView() - Applies to: Any message type matched by the template (e.g.,
UIKitConstants.MessageType.TEXT) - Default behavior: The
headerView,contentView, andfooterViewtogether form a message bubble - Override: Pass a
MessagesViewHolderListenertosetBubbleView()that inflates a completely custom bubble layout increateView()and binds data inbindView()
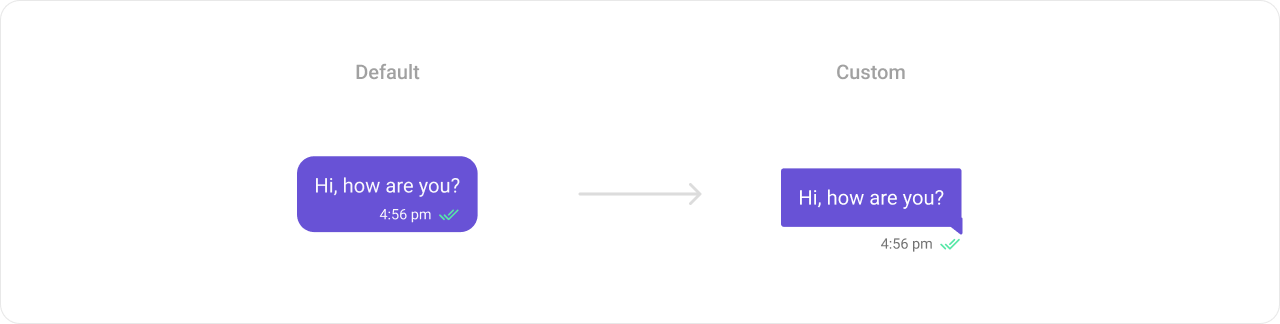
What this does: Defines a vector drawable for the left (incoming) bubble background with a speech-bubble tail pointing left, using the neutral color.drawable/right_bubble_bg
What this does: Defines a vector drawable for the right (outgoing) bubble background with a speech-bubble tail pointing right, using the primary color.outgoing_text_bubble_view.xml
What this does: Defines the outgoing (sent) text bubble layout with a right-aligned bubble background, a text messageincoming_text_bubble_view.xmlTextView, a timestamp, and aCometChatMessageReceiptview.
What this does: Defines the incoming (received) text bubble layout with a left-aligned bubble background, a text message TextView, and a timestamp (no receipt icon for incoming messages).
Code:
- Kotlin
- Java
What this does: ThecreateView()method inflatesincoming_text_bubble_view.xmlif the alignment isLEFT(received messages) oroutgoing_text_bubble_view.xmlif the alignment isRIGHT(sent messages). ThebindView()method sets the message text, timestamp, and receipt icon (for sent messages only), completely replacing the default bubble structure.
- Verify: Text messages display with custom speech-bubble-shaped backgrounds — outgoing messages use the primary color with a right-pointing tail, incoming messages use the neutral color with a left-pointing tail. Each bubble shows the message text, timestamp, and (for sent messages) a delivery receipt icon.
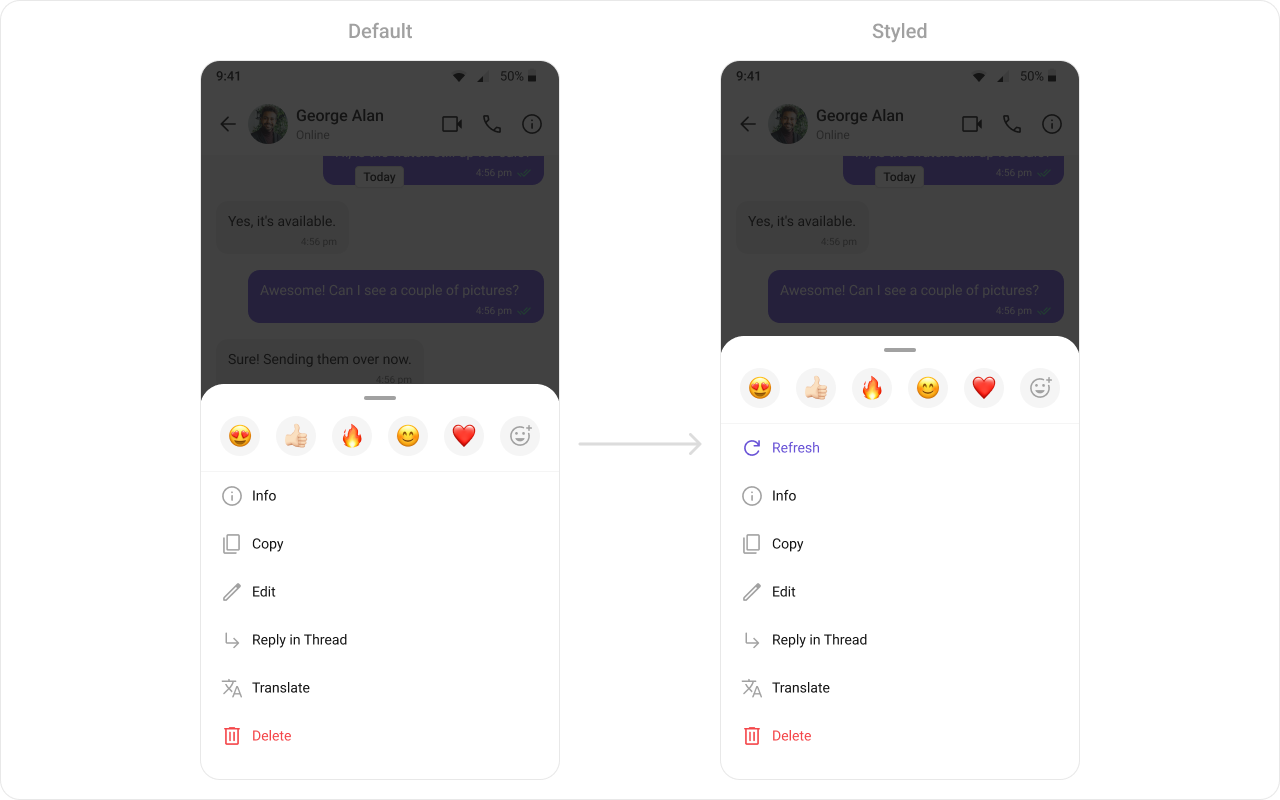
Options List
What you are changing: The list of actions that appear in the action sheet when a message is long-pressed.- Where: Lambda/callback passed to
template.setOptions()ormessageTemplate.setOptions() - Applies to: Any message type matched by the template
- Default behavior: Displays a set of options like “Reply”, “Forward”, “Edit”, and “Delete”
- Override: Pass a lambda to
setOptions()that returns a custom list ofCometChatMessageOptionobjects
- Kotlin
- Java
What this does: Creates a custom “Refresh” option usingCometChatMessageOptionwith an ID of"REFRESH", a label, an icon, and a click handler that shows a toast. This option is prepended to the default options list retrieved fromCometChatUIKit.getDataSource().getMessageOptions(), so the “Refresh” option appears first in the long-press action sheet for all message types.
- Verify: Long-pressing any message displays an action sheet with “Refresh” as the first option, followed by the default options (Reply, Forward, Edit, Delete, etc.). Tapping “Refresh” shows a toast message “Refresh clicked”.
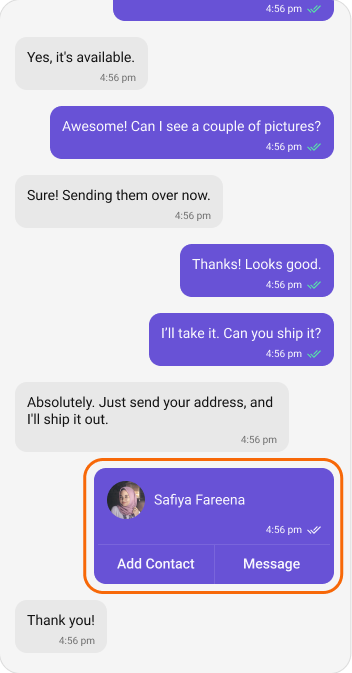
New Template
What you are changing: Adding an entirely new message template for a custom message type that does not have a default template.- Where: Create a new
CometChatMessageTemplateinstance and add it to the templates list - Applies to: Custom message types (e.g., a “card” type with
UIKitConstants.MessageCategory.CUSTOM) - Default behavior: Custom message types without a template are not rendered in the
MessageList - Override: Create a new
CometChatMessageTemplate, set itstypeandcategory, define asetBubbleView(), and add it to the templates list
- Kotlin
- Java
What this does: Creates aXML Layout for the contact card:CustomMessagewith type"card"containing contact data (contact_name,contact_avatar,contact_number) as aJSONObject, and sends it usingCometChatUIKit.sendCustomMessage().
contact_card.xml
What this does: Defines a contact card layout usingCreating and registering the new template:MaterialCardViewwith aCometChatAvatar, contact name, timestamp, receipt icon, a separator, and two action buttons (“Add Contact” and “Message”).
- Kotlin
- Java
What this does: Creates a newCometChatMessageTemplatewith type"card"and categoryUIKitConstants.MessageCategory.CUSTOM. ThesetBubbleView()inflatescontact_card.xmland binds the contact name, avatar, timestamp, and receipt from theCustomMessage’scustomDataJSON. The new template is added to the existing templates list and applied to theMessageListviasetTemplates(). This renders the custom “card” message as a contact card in the chat.
- Verify: Custom messages with type
"card"appear in theMessageListas a purple contact card showing the contact’s avatar, name, timestamp, delivery receipt (for sent messages), and two action buttons (“Add Contact” and “Message”).
Customization Matrix
| What you want to change | Where | Property/API | Example |
|---|---|---|---|
| Message type mapping | CometChatMessageTemplate | setType() | messageTemplate.setType(UIKitConstants.MessageType.CUSTOM) |
| Message category mapping | CometChatMessageTemplate | setCategory() | messageTemplate.setCategory(UIKitConstants.MessageCategory.CUSTOM) |
| Header area (sender name) | CometChatMessageTemplate | setHeaderView() | Pass a MessagesViewHolderListener that inflates a custom header layout |
| Content area (message body) | CometChatMessageTemplate | setContentView() | Pass a MessagesViewHolderListener that inflates a custom content layout |
| Footer area (timestamp/receipt) | CometChatMessageTemplate | setFooterView() | Pass a MessagesViewHolderListener that inflates a custom footer layout |
| Bottom area (below content) | CometChatMessageTemplate | setBottomView() | Pass a MessagesViewHolderListener that inflates a custom bottom layout |
| Status info (in-bubble receipt) | CometChatMessageTemplate | setStatusInfoView() | Pass a MessagesViewHolderListener that returns a minimal or custom view |
| Entire bubble layout | CometChatMessageTemplate | setBubbleView() | Pass a MessagesViewHolderListener that inflates a fully custom bubble layout |
| Long-press action options | CometChatMessageTemplate | setOptions() | Pass a lambda returning a list of CometChatMessageOption objects |